Showing posts with label Ubuntu. Show all posts

Monday, January 14, 2013

Backing up Ubuntu Using Deja Dup and Amazon Web Services S3

deja-dup-duplicity-ubuntu-aws-s3-backup-logo

Ubuntu includes a nice backup tool called Déjà Dup based on Duplicity that gives us just the options we need to handle our home backups. With just a couple of settings we can use Amazon Web Services S3 as device for those backups.


S3 Bucket and Credentials

If none specified, Deja-Dup will automatically create a bucket in S3 using our credentials. This will happen at the default AWS Region (North Virginia). If you need your backups placed elsewhere (a closer region for example) you should manually create a S3 bucket for that purpose.

You need to create an AWS IAM user with S3 privileges and export its credentials to be used with Deja-Dup.


Install Additional Packages

By default the Ubuntu backup utility does't recognize AWS S3 as Backup Storage. We need these additional packages:


# sudo apt-get install python-boto

# sudo apt-get install python-cloudfiles


S3 configuration

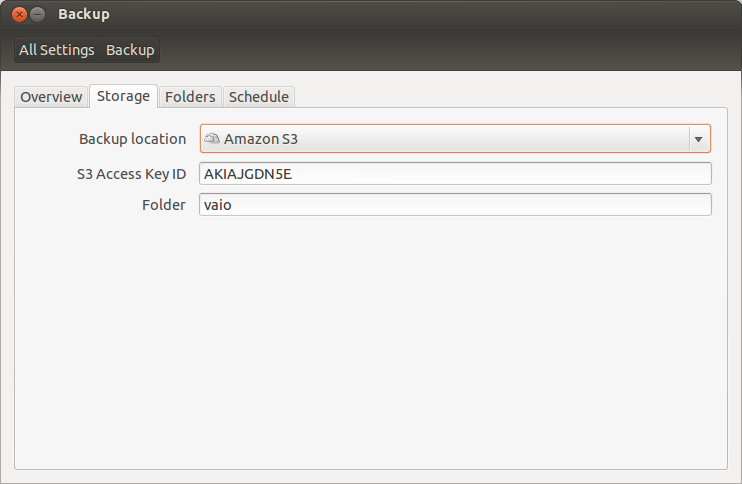
Open Déjà-Dup (Backup) and select the Storage menu. If the additional packages are correctly installed you should have "Amazon S3" as an available Backup Location. Select it and type your S3 Key and the folder your like to store your laptop backup.

blog-domenech-org-aws-s3-ubuntu-backup-deja-dup

You should see something like the capture above. Close the Backup utility.


Bucket Configuration

To tell Déjà-Dup the bucket name we want to use we need dconf. Execute dconf or install it if needed (sudo apt-get install dconf-tools).

Access to  / org / gnome / deja-dup / s3  folder:

blog-domenech-org-aws-s3-ubuntu-backup-deja-dup-dconf

Substitute the random generated Deja-Dup bucket name by yours and close dconf.


Backup Launch

Start again Deja-Dup and launch your backup. A pop-up window will appear asking you for the S3 Secret Access Key. My suggestion is to select to remember those credentials to avoid the need of typing them every time.

blog-domenech-org-amazon-web-services-ubuntu-backup-deja-dup-connect-to-s3

And the rest of the backup process is standard: Pop-up window asking you for a password to encrypt the backup files, scan progress window, etc.
I suggest you to check after a successful backup whether the duplicity files are in the expected S3 Bucket or not. And pay attention to the "Folders to Ignore" Backup setting to avoid copying unnecessary files. S3 is cheap but is not free.


Thursday, December 27, 2012

¿Cómo ver Netflix en España?


Este popular proveedor de video on-demand no se encuentra disponible en nuestro país y su página web se negará a registrarnos a su servicio. Actualmente hay un método para conseguir registrarnos a Netflix desde aquí y disfrutar de su contenido utilizando UnBlockUS. UnBlockUS nos ofrece una semana de prueba gratuita y luego su coste es de $4,99/mes. Netflix nos ofrece un mes de prueba gratuita y luego su coste es de $7,99/mes. También podemos utilizar nuestro PC Ubuntu como periférico compatible Netflix utilizando PPA for Netflix Desktop. Esta utilidad es gratuita.

Pasos:

- En la página principal de UnBlockUS accedemos a su oferta de prueba introduciendo nuestra dirección de correo.

- Luego configuramos nuestro cliente DNS para que utilice sus servidores de DNS. Nuestro /etc/resolv.conf debe quedar así:

nameserver 208.122.23.22
nameserver 208.122.23.23

O si utilizamos DHCP y la consola gráfica, así:


- Nos autenticamos (Log In) y accedemos a su página de ayuda para acceder a Netflix. Es importante destacar que el proceso de creación de nuestra cuenta en Netflix lo haremos desde esta ayuda entrando en http://join-us.netflix.com/ Esta página no funcionará si no hemos realizado los anteriores pasos correctamente.

- Nos damos de alta en Netflix.

- Instalamos el cliente de Netflix siguiendo esta ayuda. Este cliente es una adaptación para Wine del cliente para Microsoft Windows. Los pasos principales son:

sudo apt-add-repository ppa:ehoover/compholio
sudo apt-get update
sudo apt-get install netflix-desktop

- Desde Inicio de Ubuntu tecleamos Netflix y ejecutamos la aplicación. En la primera ejecución Wine descargará otros componentes necesarios. Los errores en esta fase son comunes. Ignorar y repetir.

- Nos autenticamos en Netflix y listo.


Consideraciones adicionales:

Debemos considerar UnBlockUS como un servicio de proxy como otros servicios similares que existen para acceder a proveedores de contenido que solo funcionan con una IP origen americana. Pero tiene la peculiaridad que su método de configuración consiste en delegar a ellos toda nuestra resolución DNS. Una vez nuestro cliente lanza una petición de resolución contra sus servidores, estos deciden si se trata de un servicio del cual quieren hacer proxy o no. En caso negativo los servidores DNS nos devuelven la IP auténtica sin cambios y nuestro ordenador accede a ese contenido sin utilizar la infraestructura de UnBlockUS. Y solo en el caso de ciertos servicios (Netflix, Vudu y Hudu Plus) sus servidores DNS "falsean" la resolución y nos devuelven las IPs de los Proxy de UnBlockUS. Este funcionamiento se puede comprar con un simple dig:

Primero la resolución estandard usando un servidor de DNS público:

# dig netflix.com A @8.8.8.8

; <<>> DiG 9.8.1-P1 <<>> netflix.com A @8.8.8.8
;; global options: +cmd
;; Got answer:
;; ->>HEADER<<- opcode: QUERY, status: NOERROR, id: 3635
;; flags: qr rd ra; QUERY: 1, ANSWER: 1, AUTHORITY: 0, ADDITIONAL: 0

;; QUESTION SECTION:
;netflix.com. IN A

;; ANSWER SECTION:
netflix.com. 3 IN A 69.53.236.17

;; Query time: 54 msec
;; SERVER: 8.8.8.8#53(8.8.8.8)
;; WHEN: Thu Dec 27 17:19:36 2012
;; MSG SIZE  rcvd: 45

Y luego utilizando el servidor de DNS de UnBlockUS:

# dig netflix.com A @208.122.23.22 

; <<>> DiG 9.8.1-P1 <<>> netflix.com A @208.122.23.22
;; global options: +cmd
;; Got answer:
;; ->>HEADER<<- opcode: QUERY, status: NOERROR, id: 9078
;; flags: qr aa rd ra; QUERY: 1, ANSWER: 6, AUTHORITY: 0, ADDITIONAL: 0

;; QUESTION SECTION:
;netflix.com. IN A

;; ANSWER SECTION:
netflix.com. 180 IN A 173.208.170.14
netflix.com. 180 IN A 173.230.240.197
netflix.com. 180 IN A 204.12.200.14
netflix.com. 180 IN A 67.216.222.14
netflix.com. 180 IN A 147.255.171.14
netflix.com. 180 IN A 147.255.227.14

;; Query time: 80 msec
;; SERVER: 208.122.23.22#53(208.122.23.22)
;; WHEN: Thu Dec 27 17:20:49 2012
;; MSG SIZE  rcvd: 125

Es una solución inteligente pero arroja dudas en cuanto a la privacidad. En una configuración como esta UnBlockUS tiene visibilidad de todas nuestras peticiones DNS y puede decidir cuales altera y cuales no. Si utilizamos este servicio para acceder a streaming desde un periférico tipo Roku o similar este detalle no tiene la menor importancia pero si utilizamos nuestro ordenador personal o tablet la cosa cambia. A discreción del lector.

Friday, June 1, 2012

Surfing with IPv6


My DSL carrier (and as far I know no Spanish ADSL carriers) has IPv6 available so my only chance to join IPv6 Launch Day is to create a tunnel to a IPv6 service provider. I've choose the well known Hurricane Electric Tunnel Broker free service.

Easy steps using Ubuntu:
- Sign-in.
- Create your tunnel connection towards your public IPv4 address (Note: You will need to allow HE to ping your router in your firewall configuration).
- Configuration following this guide: http://davecoyle.com/documents/ubuntu-ipv6-he-tunnel.html
- Add the IPv6 DNS server at your /etc/resolv.conf file. In this cases is: nameserver 2001:470:20::2
My suggestion, and for the sake of the test, is to use only this DNS server.
And test!

How my IPv6 tunnel interface looks like:

# ifconfig he-ipv6
he-ipv6   Link encap:IPv6-in-IPv4 
          inet6 addr: 2001:470:1f08:16b::2/64 Scope:Global
          UP POINTOPOINT RUNNING NOARP  MTU:1480  Metric:1
          RX packets:24393 errors:0 dropped:0 overruns:0 frame:0
          TX packets:15097 errors:0 dropped:0 overruns:0 carrier:0
          collisions:0 txqueuelen:0
          RX bytes:30140949 (30.1 MB)  TX bytes:1460976 (1.4 MB)

And the local interface. Now we have the new localhost IPv6 address ::1 (In IPv6 this is the equivalent of 127.0.0.1).

lo        Link encap:Local Loopback 
          inet addr:127.0.0.1  Mask:255.0.0.0
          inet6 addr: ::1/128 Scope:Host
          UP LOOPBACK RUNNING  MTU:16436  Metric:1
          RX packets:1043 errors:0 dropped:0 overruns:0 frame:0
          TX packets:1043 errors:0 dropped:0 overruns:0 carrier:0
          collisions:0 txqueuelen:0
          RX bytes:105946 (105.9 KB)  TX bytes:105946 (105.9 KB)

First, ping my interface (notice that I'm using ping6 command):

# ping6 -c 5 2001:470:1f08:16b::2
PING 2001:470:1f08:16b::2(2001:470:1f08:16b::2) 56 data bytes
64 bytes from 2001:470:1f08:16b::2: icmp_seq=1 ttl=64 time=0.033 ms
64 bytes from 2001:470:1f08:16b::2: icmp_seq=2 ttl=64 time=0.048 ms
64 bytes from 2001:470:1f08:16b::2: icmp_seq=3 ttl=64 time=0.062 ms
64 bytes from 2001:470:1f08:16b::2: icmp_seq=4 ttl=64 time=0.047 ms
64 bytes from 2001:470:1f08:16b::2: icmp_seq=5 ttl=64 time=0.032 ms
--- 2001:470:1f08:16b::2 ping statistics ---
5 packets transmitted, 5 received, 0% packet loss, time 3996ms
rtt min/avg/max/mdev = 0.032/0.044/0.062/0.012 ms

Then, ping the other side of the tunnel (notice the round trip time change):

# ping6 -c 5 2001:470:1f08:16b::1
PING 2001:470:1f08:16b::1(2001:470:1f08:16b::1) 56 data bytes
64 bytes from 2001:470:1f08:16b::1: icmp_seq=1 ttl=64 time=66.7 ms
64 bytes from 2001:470:1f08:16b::1: icmp_seq=2 ttl=64 time=66.5 ms
64 bytes from 2001:470:1f08:16b::1: icmp_seq=3 ttl=64 time=66.5 ms
64 bytes from 2001:470:1f08:16b::1: icmp_seq=4 ttl=64 time=66.3 ms
64 bytes from 2001:470:1f08:16b::1: icmp_seq=5 ttl=64 time=67.4 ms
--- 2001:470:1f08:16b::1 ping statistics ---
5 packets transmitted, 5 received, 0% packet loss, time 4007ms
rtt min/avg/max/mdev = 66.309/66.720/67.461/0.460 ms

And then, my first IPv6 ping to Google :)

# ping6 -c 5 -n ipv6.google.com
PING ipv6.google.com(2a00:1450:400d:803::1013) 56 data bytes
64 bytes from 2a00:1450:400d:803::1013: icmp_seq=1 ttl=57 time=167 ms
64 bytes from 2a00:1450:400d:803::1013: icmp_seq=2 ttl=57 time=176 ms
64 bytes from 2a00:1450:400d:803::1013: icmp_seq=3 ttl=57 time=170 ms
64 bytes from 2a00:1450:400d:803::1013: icmp_seq=4 ttl=57 time=176 ms
64 bytes from 2a00:1450:400d:803::1013: icmp_seq=5 ttl=57 time=176 ms
--- ipv6.google.com ping statistics ---
5 packets transmitted, 5 received, 0% packet loss, time 4006ms
rtt min/avg/max/mdev = 167.003/173.506/176.744/3.987 ms

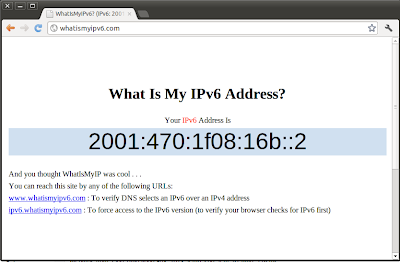
And now is time for a browser and what could be better than http://whatismyipv6.com (IPv6 style of course :)

whatismyipv6.com
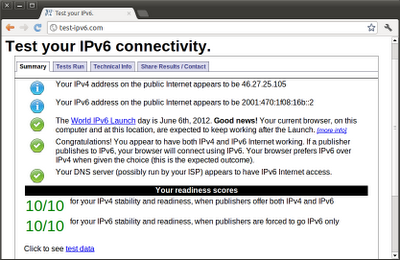
And http://test-ipv6.com

test-ipv6.com

Google redirects me to the UK site although I'm at Spain. That's because among all the tunnels endpoints from Hurricane Electric I've choose the one at London. But there are more. This could become handy later.


A curios ping :)

# ping6 -n -c1 www.v6.facebook.com
PING www.v6.facebook.com(2620:0:1cfe:face:b00c::3) 56 data bytes
64 bytes from 2620:0:1cfe:face:b00c::3: icmp_seq=1 ttl=51 time=197 ms
--- www.v6.facebook.com ping statistics ---
1 packets transmitted, 1 received, 0% packet loss, time 0ms
rtt min/avg/max/mdev = 197.501/197.501/197.501/0.000 ms

And a couple more:

2a01:4f8:d13:3a43:feed:abba:deca:f       www.synchronkartei.de
2001:4cc0:1ff:40:bebe:cafe:bebe:cafe     www.webtuga.com
2001:610:148:dead:beef:b00b:cafe:babe    www.ist-mome.org