Showing posts with label Linux. Show all posts

Monday, February 27, 2017

Unix like " tail -f " command for Elasticsearch (using Python)

elasticsearch-logo-tail-command-linux-blog-domenech-org


Humble implementation of a Unix like "tail" command for Elasticsearch using Python.

Tested with Logstash indexed content.

Install


$ git clone https://github.com/juan-domenech/elasticsearch-python.git
$ cd elasticsearch-python/
$ python elasticsearch-tail.py


Basic usage

The only mandatory parameter is --endpoint

Example:

$ python elasticsearch-tail.py --endpoint http://elk.example.com


By default the last 10 lines of log are displayed. You can change this behaviour with --docs or -n switch.

Example: To display the last 50 lines.

$ python elasticsearch-tail.py --endpoint http://elk.example.com -n 50


To have continuous output use -f or --nonstop

Example:

$ python elasticsearch-tail.py --endpoint http://elk.example.com -f


By default ES type = apache is used. You can select other types with --type

Examples:

$ python elasticsearch-tail.py --endpoint http://elk.example.com --type java

$ python elasticsearch-tail.py --endpoint http://elk.example.com --type apache


Advanced


By default the more recent Logstash Index is used. Optionally you can specify the desired index name using --index

Example:

$ python elasticsearch-tail.py --endpoint http://elk.example.com --index logstash-2016.08.08


When using --type java there are two other selectors available: --javalevel and --javaclass

Examples:

$ python elasticsearch-tail.py --endpoint http://elk.example.com --type java --javalevel ERROR

$ python elasticsearch-tail.py --endpoint http://elk.example.com --type java --javaclas error.handler.java.class


When using --type apache there are two other selectors available: --httpresponse and --httpmethod

Examples:

$ python elasticsearch-tail.py --endpoint http://elk.example.com --type apache --httpresponse 404

$ python elasticsearch-tail.py --endpoint http://elk.example.com --type apache --httpmethod POST


To display the native Elasticsearch timestamp of each event use --showheaders (Convenient when adding a |grep on the output to do additional filtering):

Example:

$ python elasticsearch-tail.py --endpoint http://elk.example.com --showheaders


To display events belonging to a particular host and ignore the rest use --hostname

Example:

$ python elasticsearch-tail.py --endpoint http://elk.example.com --hostname server1.example.com


Connection modes


The default protocol is HTTP (Port 80) but any other port can be specified under --endpoint

Example for HTTPS:

$ python elasticsearch-tail.py -f --endpoint https://elk.example.com 

or

$ python elasticsearch-tail.py -f --endpoint https://elk.example.com:443


Example for Elasticsearch native port:

$ python elasticsearch-tail.py -f --endpoint http://elk.example.com:9200


Known issues

You need elasticsearch Python module installed


If you don't have it, run 'sudo pip install elasticsearch' to install it.


TLS error: "elasticsearch.exceptions.ConnectionError: ConnectionError(('Connection failed.', CannotSendRequest())) caused by: ConnectionError(('Connection failed.', CannotSendRequest()))"


Update urllib3 running 'sudo pip install --upgrade urllib3' or use a non HTTPS Endpoint URL.


Error: "check_index: No index found! Exiting"


The current script only cares for indices with the "logstash-" prefix. If you use any other prefix to index your logs it will fail.
If you think this shouldn't be this way please let me know in the comments.


elasticsearch-logo-tail-command-linux-python-blog-domenech-org

Done for fun. Feel free to comment on bugs or additional desired features.

Thank you!

Tuesday, April 8, 2014

Install Official Bitcoin Wallet On AWS EC2 Linux AMI (or RedHat / CentOS)


This article is now obsolete.
Please refer to the newer version:


Update 2014-04-09: Using bitcoin-0.9.1 with Heartbleed patch.

You should know that RedHat, CentOS or Amazon Linux AMI are not the best choice when it comes to use Bitcoin wallet or other Bitcoin related activities. If you are looking for the easy path you should use Ubuntu Linux or Microsoft Windows as platform. The community is much bigger there.

But if you are determined like me to have your Bitcoin Wallet in the Cloud here you have some instructions. They apply to RedHat and its branches like AWS Linux AMI and CentOS.

Launch a EC2 Instance using Amazon Linux AMI HVM. In this example is ami-b521dfc2 (Ireland). I suggest to use the HVM version to maintain compatibility among different EC2 Instance Types.

All command are executed using ec2-user


Update & Reboot


sudo yum update
sudo reboot


PU_IAS6 Repository & Berkeley DB4.8

We will need Berkeley DB 4.8 but our OS comes with 4.7. Let's use PUIAS repository to get the RPMs with need.
Create the repository config file /etc/yum.repos.d/puias-computational.repo and paste into it the repository definition.


sudo vim /etc/yum.repos.d/puias-computational.repo


[puias-computational]
name=PUIAS Computational
baseurl=http://puias.math.ias.edu/data/puias/computational/6/x86_64/
enabled=1
gpgcheck=0


sudo yum install db48 db48-devel


Boost-Devel


sudo yum install boost-devel


OpenSSL

We need Elliptic Curve Encryption for Bitcoin to work. For some reason it is missing in RHEL distributions. We have to patch around that.

Download & Install OpenSSL source


wget https://www.openssl.org/source/openssl-1.0.1f.tar.gz
tar xvfz openssl-1.0.1f.tar.gz
cd openssl-1.0.1f
export CFLAGS="-fPIC"
./config shared


Disable man pages


vim Makefile


Locate a line with this content "install: all install_docs install_sw" (Line #543) and remove "install_docs" command from it.
The final result should look like this:

...
...
...
        @$(MAKE) TAR='$(TAR)' TARFLAGS='$(TARFLAGS)' tar

dist_pem_h:
        (cd crypto/pem; $(MAKE) -e $(BUILDENV) pem.h; $(MAKE) clean)

install: all install_sw

install_sw:
        @$(PERL) $(TOP)/util/mkdir-p.pl $(INSTALL_PREFIX)$(INSTALLTOP)/bin \
                $(INSTALL_PREFIX)$(INSTALLTOP)/$(LIBDIR) \
...
...
...

Make & Install


make depend
make all
sudo -E make install


If we are errors free, continue copying the following files:


sudo cp /usr/local/ssl/lib/pkgconfig/libssl.pc /usr/lib64/pkgconfig/
sudo cp /usr/local/ssl/lib/pkgconfig/libcrypto.pc /usr/lib64/pkgconfig/

sudo cp /usr/local/ssl/lib/libssl.so.1.0.0 /usr/lib64/
sudo cp /usr/local/ssl/lib/libcrypto.so.1.0.0 /usr/lib64/

cd


Bitcoin

Official Bitcoin download source & Install


cd
wget https://bitcoin.org/bin/0.9.1/bitcoin-0.9.1-linux.tar.gz
tar xvfz bitcoin-0.9.0-linux.tar.gz
cd bitcoin-0.9.0-linux/src/
tar xvfz bitcoin-0.9.0.tar.gz
cd bitcoin-0.9.0/
./configure


If everything goes well you should have and output like this one:

$ ./configure 
checking build system type... x86_64-unknown-linux-gnu
checking host system type... x86_64-unknown-linux-gnu
checking for a BSD-compatible install... /usr/bin/install -c
checking whether build environment is sane... yes
checking for a thread-safe mkdir -p... /bin/mkdir -p
checking for gawk... gawk
checking whether make sets $(MAKE)... yes
checking whether to enable maintainer-specific portions of Makefiles... yes
checking whether make supports nested variables... yes
checking for g++... g++
checking whether the C++ compiler works... yes
checking for C++ compiler default output file name... a.out
checking for suffix of executables... 
checking whether we are cross compiling... no
checking for suffix of object files... o
checking whether we are using the GNU C++ compiler... yes
checking whether g++ accepts -g... yes
checking for style of include used by make... GNU
checking dependency style of g++... gcc3
checking for gcc... gcc
checking whether we are using the GNU C compiler... yes
checking whether gcc accepts -g... yes
checking for gcc option to accept ISO C89... none needed
checking dependency style of gcc... gcc3
checking how to run the C preprocessor... gcc -E
checking how to run the C++ preprocessor... g++ -E
checking for gcc... gcc
checking whether we are using the GNU Objective C compiler... no
checking whether gcc accepts -g... no
checking dependency style of gcc... gcc3
checking for g++... g++
checking whether we are using the GNU Objective C++ compiler... no
checking whether g++ accepts -g... no
checking for a sed that does not truncate output... /bin/sed
checking for ar... /usr/bin/ar
checking for ranlib... /usr/bin/ranlib
checking for strip... /usr/bin/strip
checking for gcov... /usr/bin/gcov
checking for lcov... no
checking for java... /usr/bin/java
checking for genhtml... no
checking for git... no
checking for ccache... no
checking for xgettext... no
checking for hexdump... /usr/bin/hexdump
checking for pkg-config... /usr/bin/pkg-config
checking pkg-config is at least version 0.9.0... yes
checking for grep that handles long lines and -e... /bin/grep
checking for egrep... /bin/grep -E
checking for ANSI C header files... yes
checking for sys/types.h... yes
checking for sys/stat.h... yes
checking for stdlib.h... yes
checking for string.h... yes
checking for memory.h... yes
checking for strings.h... yes
checking for inttypes.h... yes
checking for stdint.h... yes
checking for unistd.h... yes
checking whether byte ordering is bigendian... no
checking if compiler needs -Werror to reject unknown flags... no
checking for the pthreads library -lpthreads... no
checking whether pthreads work without any flags... no
checking whether pthreads work with -Kthread... no
checking whether pthreads work with -kthread... no
checking for the pthreads library -llthread... no
checking whether pthreads work with -pthread... yes
checking for joinable pthread attribute... PTHREAD_CREATE_JOINABLE
checking if more special flags are required for pthreads... no
checking for PTHREAD_PRIO_INHERIT... yes
checking for special C compiler options needed for large files... no
checking for _FILE_OFFSET_BITS value needed for large files... no
checking whether the linker accepts -Wl,--large-address-aware... no
checking whether C++ compiler accepts -Wstack-protector... yes
checking whether C++ compiler accepts -fstack-protector-all... yes
checking whether C++ compiler accepts -fPIE... yes
checking whether C++ preprocessor accepts -D_FORTIFY_SOURCE=2... yes
checking whether C++ preprocessor accepts -U_FORTIFY_SOURCE... yes
checking whether the linker accepts -Wl,--dynamicbase... no
checking whether the linker accepts -Wl,--nxcompat... no
checking whether the linker accepts -Wl,-z,relro... yes
checking whether the linker accepts -Wl,-z,now... yes
checking whether the linker accepts -pie... yes
checking stdio.h usability... yes
checking stdio.h presence... yes
checking for stdio.h... yes
checking for stdlib.h... (cached) yes
checking for unistd.h... (cached) yes
checking for strings.h... (cached) yes
checking for sys/types.h... (cached) yes
checking for sys/stat.h... (cached) yes
checking for MSG_NOSIGNAL... yes
checking for Berkeley DB C++ headers... /usr/include/db4/
checking for main in -ldb_cxx-4.8... yes
checking miniupnpc/miniwget.h usability... no
checking miniupnpc/miniwget.h presence... no
checking for miniupnpc/miniwget.h... no
checking miniupnpc/miniupnpc.h usability... no
checking miniupnpc/miniupnpc.h presence... no
checking for miniupnpc/miniupnpc.h... no
checking miniupnpc/upnpcommands.h usability... no
checking miniupnpc/upnpcommands.h presence... no
checking for miniupnpc/upnpcommands.h... no
checking miniupnpc/upnperrors.h usability... no
checking miniupnpc/upnperrors.h presence... no
checking for miniupnpc/upnperrors.h... no
checking for boostlib >= 1.20.0... yes
checking whether the Boost::System library is available... yes
checking for exit in -lboost_system... yes
checking whether the Boost::Filesystem library is available... yes
checking for exit in -lboost_filesystem... yes
checking whether the Boost::Program_Options library is available... yes
checking for exit in -lboost_program_options-mt... yes
checking whether the Boost::Thread library is available... yes
checking for exit in -lboost_thread... yes
checking whether the Boost::Chrono library is available... yes
checking for exit in -lboost_chrono-mt... yes
checking whether the Boost::Unit_Test_Framework library is available... yes
checking for dynamic linked boost test... yes
checking for SSL... yes
checking for CRYPTO... yes
checking for PROTOBUF... no
configure: WARNING: libprotobuf not found; bitcoin-qt frontend will not be built
checking whether to build bitcoind... yes
checking whether to build bitcoin-cli... yes
checking whether to build Bitcoin Core GUI... no (Qt)
checking for operating system IPv6 support... yes
checking if ccache should be used... no
checking if wallet should be enabled... yes
checking whether to build with support for IPv6... yes
checking whether to build with support for UPnP... no
checking whether to build test_bitcoin... yes
configure: creating ./config.status
config.status: creating Makefile
config.status: creating src/Makefile
config.status: creating src/test/Makefile
config.status: creating src/qt/Makefile
config.status: creating src/qt/test/Makefile
config.status: creating share/setup.nsi
config.status: creating share/qt/Info.plist
config.status: creating qa/pull-tester/run-bitcoind-for-test.sh
config.status: creating qa/pull-tester/build-tests.sh
config.status: creating src/bitcoin-config.h
config.status: executing depfiles commands
$

If it does not, review all the previous steps and repeat.

Make, Install & Execute (Note "d" after bitcoin. We use Bitcoin wallet as daemon)


make
sudo make install
bitcoind


Expected output:

$ bitcoind
Error: To use the "-server" option, you must set a rpcpassword in the configuration file:
/home/ec2-user/.bitcoin/bitcoin.conf
It is recommended you use the following random password:
rpcuser=bitcoinrpc
rpcpassword=abcdabcdabcdabcdabcdabcdabcdabcdabcdabcdabcdabcd
(you do not need to remember this password)
The username and password MUST NOT be the same.
If the file does not exist, create it with owner-readable-only file permissions.
It is also recommended to set alertnotify so you are notified of problems;
for example: alertnotify=echo %s | mail -s "Bitcoin Alert" admin@foo.com
$

Bitcoind is telling us that we need a minimal configuration file to start with. With the first execution the .bitcoin folder is automatically created under our user directory.


cd
cd .bitcoin

vim bitcoin.conf


You can begin with this basic configuration file (Manual page).

server=1
daemon=1
rpcuser=<A LONG & UNIQUE USERNAME HERE>
rpcpassword=<A VERY GOOD PASSWORD HERE>

Let's try again:


bitcoind


And the expected result on console:

Bitcoin server starting


and now the debug.log file should be moving. We can see the initialization process and messages like these:

2014-04-08 18:34:33 Pre-allocating up to position 0x100000 in rev00000.dat
2014-04-08 18:34:33 UpdateTip: new best=00000000839a8e6886ab5951d76f411475428afc90947ee320161bbf18eb6048  height=1  log2_work=33.000022  tx=2  da
te=2009-01-09 02:54:25 progress=0.000000
2014-04-08 18:34:33 ProcessBlock: ACCEPTED
2014-04-08 18:34:33 UpdateTip: new best=000000006a625f06636b8bb6ac7b960a8d03705d1ace08b1a19da3fdcc99ddbd  height=2  log2_work=33.584985  tx=3  da
te=2009-01-09 02:55:44 progress=0.000000
2014-04-08 18:34:33 ProcessBlock: ACCEPTED
2014-04-08 18:34:33 UpdateTip: new best=0000000082b5015589a3fdf2d4baff403e6f0be035a5d9742c1cae6295464449  height=3  log2_work=34.000022  tx=4  da
te=2009-01-09 03:02:53 progress=0.000000
2014-04-08 18:34:33 ProcessBlock: ACCEPTED

This is our wallet loading and verifying all the Bitcoin blockchain. When the process is complete your wallet will become a node of the Bitcoin network and will help validating Bitcoin transactions. It could take more than 24 hours for the process to complete. You can learn more about this here.
There is a way to speed up this process by downloading a Torrent file. More details at the end of this post.

You can issue commands to interact with the daemon. For instance:


bitcoind getblockcount


to get the number of blocks imported so far. Type bitcoind help for the whole list.


Initializing Blockchain database using Torrent


bitcoind stop
sudo yum install transmission-cli
cd ~/.bitcoin
transmission-cli https://bitcoin.org/bin/blockchain/bootstrap.dat.torrent
bitcoind -loadblock=~/.bitcoin/bootstrap.dat


Torrent File ReadMe.txt


This article is now obsolete.
Please refer to the newer version:


Monday, January 14, 2013

Backing up Ubuntu Using Deja Dup and Amazon Web Services S3

deja-dup-duplicity-ubuntu-aws-s3-backup-logo

Ubuntu includes a nice backup tool called Déjà Dup based on Duplicity that gives us just the options we need to handle our home backups. With just a couple of settings we can use Amazon Web Services S3 as device for those backups.


S3 Bucket and Credentials

If none specified, Deja-Dup will automatically create a bucket in S3 using our credentials. This will happen at the default AWS Region (North Virginia). If you need your backups placed elsewhere (a closer region for example) you should manually create a S3 bucket for that purpose.

You need to create an AWS IAM user with S3 privileges and export its credentials to be used with Deja-Dup.


Install Additional Packages

By default the Ubuntu backup utility does't recognize AWS S3 as Backup Storage. We need these additional packages:


# sudo apt-get install python-boto

# sudo apt-get install python-cloudfiles


S3 configuration

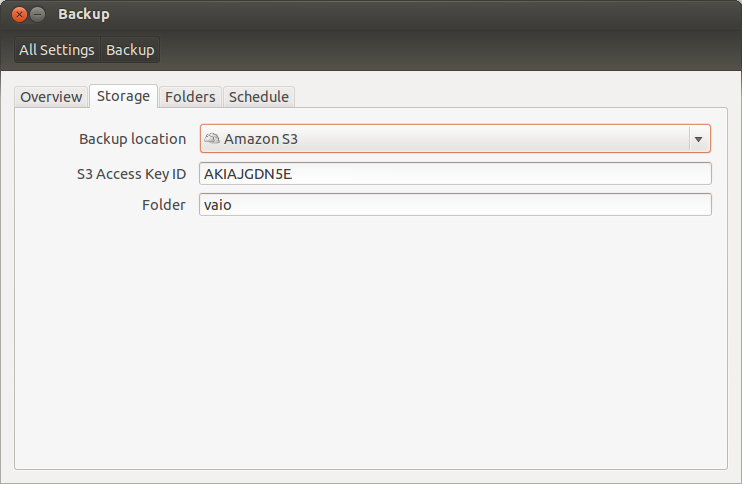
Open Déjà-Dup (Backup) and select the Storage menu. If the additional packages are correctly installed you should have "Amazon S3" as an available Backup Location. Select it and type your S3 Key and the folder your like to store your laptop backup.

blog-domenech-org-aws-s3-ubuntu-backup-deja-dup

You should see something like the capture above. Close the Backup utility.


Bucket Configuration

To tell Déjà-Dup the bucket name we want to use we need dconf. Execute dconf or install it if needed (sudo apt-get install dconf-tools).

Access to  / org / gnome / deja-dup / s3  folder:

blog-domenech-org-aws-s3-ubuntu-backup-deja-dup-dconf

Substitute the random generated Deja-Dup bucket name by yours and close dconf.


Backup Launch

Start again Deja-Dup and launch your backup. A pop-up window will appear asking you for the S3 Secret Access Key. My suggestion is to select to remember those credentials to avoid the need of typing them every time.

blog-domenech-org-amazon-web-services-ubuntu-backup-deja-dup-connect-to-s3

And the rest of the backup process is standard: Pop-up window asking you for a password to encrypt the backup files, scan progress window, etc.
I suggest you to check after a successful backup whether the duplicity files are in the expected S3 Bucket or not. And pay attention to the "Folders to Ignore" Backup setting to avoid copying unnecessary files. S3 is cheap but is not free.


Monday, October 29, 2012

Using AWS S3 with s3cmd

Our goal is to use a simple command line utility to access our S3 resources from our laptop Linux.

First, you should create a IAM User with permissions just to access your S3 Buckets. There are several options to configure an IAM User but my suggestion is to create an admin user with only access to S3. The process is similar to the Read Only User we have created before for Newvem but this time selecting the Policy Template for "Amazon S3 Full Access". This way we are sure that anything that happens to this user will only affect our S3 Buckets.

In this example I will download all the log files that have been automatically created by AWS Cloudfront during the experiment of exploring the amount of CloudFront Edge Locations that exist today and delete those files afterwards.

- Install s3cmd

$ sudo apt-get install s3cmd 

- Configure:

$ s3cmd --configure
Enter new values or accept defaults in brackets with Enter.
Refer to user manual for detailed description of all options.

Access key and Secret key are your identifiers for Amazon S3
Access Key: (Access Key for the admin S3 User we have created before)
Secret Key: (Seccret Key for the admin S3 User we have created before)

Encryption password is used to protect your files from reading
by unauthorized persons while in transfer to S3
Encryption password: (your-password)
Path to GPG program [/usr/bin/gpg]:

When using secure HTTPS protocol all communication with Amazon S3
servers is protected from 3rd party eavesdropping. This method is
slower than plain HTTP and can't be used if you're behind a proxy
Use HTTPS protocol [No]:

On some networks all internet access must go through a HTTP proxy.
Try setting it here if you can't conect to S3 directly
HTTP Proxy server name:

New settings:
  Access Key: ***********************
  Secret Key: ***************************
  Encryption password: ***********
  Path to GPG program: /usr/bin/gpg
  Use HTTPS protocol: False
  HTTP Proxy server name:
  HTTP Proxy server port: 0

Test access with supplied credentials? [Y/n] y
Please wait...
Success. Your access key and secret key worked fine :-)

Now verifying that encryption works...
Success. Encryption and decryption worked fine :-)

Save settings? [y/N] y
Configuration saved to '/home/joan/.s3cfg'

- Listing Buckets:

$ s3cmd ls 

- Listing Bucket contents (folders):

$ s3cmd ls s3://Bucket-Name 

- Listing Bucket contents (files):

$ s3cmd ls s3://Bucket-Name/Folder-Name 

- Download all folder content:

$ s3cmd get s3://Bucket-Name/Folder-Name/* 

- Delete all folder content:

$ s3cmd del s3://Bucket-Name/Folder-Name/* 

Note: This command last will delete all files AND the folder.

Note: Keep in mind that any access to AWS S3 becomes a GET, PUT, POST or LIST action and some cost may occur. Refer to Amazon Web Services S3 Pricing for details.

Friday, June 1, 2012

Surfing with IPv6


My DSL carrier (and as far I know no Spanish ADSL carriers) has IPv6 available so my only chance to join IPv6 Launch Day is to create a tunnel to a IPv6 service provider. I've choose the well known Hurricane Electric Tunnel Broker free service.

Easy steps using Ubuntu:
- Sign-in.
- Create your tunnel connection towards your public IPv4 address (Note: You will need to allow HE to ping your router in your firewall configuration).
- Configuration following this guide: http://davecoyle.com/documents/ubuntu-ipv6-he-tunnel.html
- Add the IPv6 DNS server at your /etc/resolv.conf file. In this cases is: nameserver 2001:470:20::2
My suggestion, and for the sake of the test, is to use only this DNS server.
And test!

How my IPv6 tunnel interface looks like:

# ifconfig he-ipv6
he-ipv6   Link encap:IPv6-in-IPv4 
          inet6 addr: 2001:470:1f08:16b::2/64 Scope:Global
          UP POINTOPOINT RUNNING NOARP  MTU:1480  Metric:1
          RX packets:24393 errors:0 dropped:0 overruns:0 frame:0
          TX packets:15097 errors:0 dropped:0 overruns:0 carrier:0
          collisions:0 txqueuelen:0
          RX bytes:30140949 (30.1 MB)  TX bytes:1460976 (1.4 MB)

And the local interface. Now we have the new localhost IPv6 address ::1 (In IPv6 this is the equivalent of 127.0.0.1).

lo        Link encap:Local Loopback 
          inet addr:127.0.0.1  Mask:255.0.0.0
          inet6 addr: ::1/128 Scope:Host
          UP LOOPBACK RUNNING  MTU:16436  Metric:1
          RX packets:1043 errors:0 dropped:0 overruns:0 frame:0
          TX packets:1043 errors:0 dropped:0 overruns:0 carrier:0
          collisions:0 txqueuelen:0
          RX bytes:105946 (105.9 KB)  TX bytes:105946 (105.9 KB)

First, ping my interface (notice that I'm using ping6 command):

# ping6 -c 5 2001:470:1f08:16b::2
PING 2001:470:1f08:16b::2(2001:470:1f08:16b::2) 56 data bytes
64 bytes from 2001:470:1f08:16b::2: icmp_seq=1 ttl=64 time=0.033 ms
64 bytes from 2001:470:1f08:16b::2: icmp_seq=2 ttl=64 time=0.048 ms
64 bytes from 2001:470:1f08:16b::2: icmp_seq=3 ttl=64 time=0.062 ms
64 bytes from 2001:470:1f08:16b::2: icmp_seq=4 ttl=64 time=0.047 ms
64 bytes from 2001:470:1f08:16b::2: icmp_seq=5 ttl=64 time=0.032 ms
--- 2001:470:1f08:16b::2 ping statistics ---
5 packets transmitted, 5 received, 0% packet loss, time 3996ms
rtt min/avg/max/mdev = 0.032/0.044/0.062/0.012 ms

Then, ping the other side of the tunnel (notice the round trip time change):

# ping6 -c 5 2001:470:1f08:16b::1
PING 2001:470:1f08:16b::1(2001:470:1f08:16b::1) 56 data bytes
64 bytes from 2001:470:1f08:16b::1: icmp_seq=1 ttl=64 time=66.7 ms
64 bytes from 2001:470:1f08:16b::1: icmp_seq=2 ttl=64 time=66.5 ms
64 bytes from 2001:470:1f08:16b::1: icmp_seq=3 ttl=64 time=66.5 ms
64 bytes from 2001:470:1f08:16b::1: icmp_seq=4 ttl=64 time=66.3 ms
64 bytes from 2001:470:1f08:16b::1: icmp_seq=5 ttl=64 time=67.4 ms
--- 2001:470:1f08:16b::1 ping statistics ---
5 packets transmitted, 5 received, 0% packet loss, time 4007ms
rtt min/avg/max/mdev = 66.309/66.720/67.461/0.460 ms

And then, my first IPv6 ping to Google :)

# ping6 -c 5 -n ipv6.google.com
PING ipv6.google.com(2a00:1450:400d:803::1013) 56 data bytes
64 bytes from 2a00:1450:400d:803::1013: icmp_seq=1 ttl=57 time=167 ms
64 bytes from 2a00:1450:400d:803::1013: icmp_seq=2 ttl=57 time=176 ms
64 bytes from 2a00:1450:400d:803::1013: icmp_seq=3 ttl=57 time=170 ms
64 bytes from 2a00:1450:400d:803::1013: icmp_seq=4 ttl=57 time=176 ms
64 bytes from 2a00:1450:400d:803::1013: icmp_seq=5 ttl=57 time=176 ms
--- ipv6.google.com ping statistics ---
5 packets transmitted, 5 received, 0% packet loss, time 4006ms
rtt min/avg/max/mdev = 167.003/173.506/176.744/3.987 ms

And now is time for a browser and what could be better than http://whatismyipv6.com (IPv6 style of course :)

whatismyipv6.com
And http://test-ipv6.com

test-ipv6.com

Google redirects me to the UK site although I'm at Spain. That's because among all the tunnels endpoints from Hurricane Electric I've choose the one at London. But there are more. This could become handy later.


A curios ping :)

# ping6 -n -c1 www.v6.facebook.com
PING www.v6.facebook.com(2620:0:1cfe:face:b00c::3) 56 data bytes
64 bytes from 2620:0:1cfe:face:b00c::3: icmp_seq=1 ttl=51 time=197 ms
--- www.v6.facebook.com ping statistics ---
1 packets transmitted, 1 received, 0% packet loss, time 0ms
rtt min/avg/max/mdev = 197.501/197.501/197.501/0.000 ms

And a couple more:

2a01:4f8:d13:3a43:feed:abba:deca:f       www.synchronkartei.de
2001:4cc0:1ff:40:bebe:cafe:bebe:cafe     www.webtuga.com
2001:610:148:dead:beef:b00b:cafe:babe    www.ist-mome.org