Ha sido una agradable experiencia mi colaboración en Navigate the Cloud Spain 2012 en Barcelona y Madrid. Agradezco la oportunidad que me ha dado el equipo de Celingest de representarlos y a Amazon Web Services EMEA por su invitación.
Aquí algunas de las presentaciones del genial Carlos Conde (Principal Solutions Architect, Amazon Web Services):
How Customers are Using AWS
Getting started with AWS
Deploying applications on AWS
Choosing the Right Data Storage
Big Data Analytics in the Cloud
Y la mía: Plataforma flexible para aplicaciones móviles de alta demanda
y algunas fotos :)
Friday, October 12, 2012
Monday, June 18, 2012
How to create a Read-Only IAM user for Newvem in AWS
To begin playing with the free Newvem beta service for your account in AWS (now only AWS but is planned to cover other like Rackspace, Microsoft Azure and HP Openstack) is highly recommendable to create an specific Read-Only IAM User Account. I'm suggesting this because is the best way to proceed with this service or any other AWS access for your users or for your external user.
Basic rule: Different users for every role and different permissions for every role.
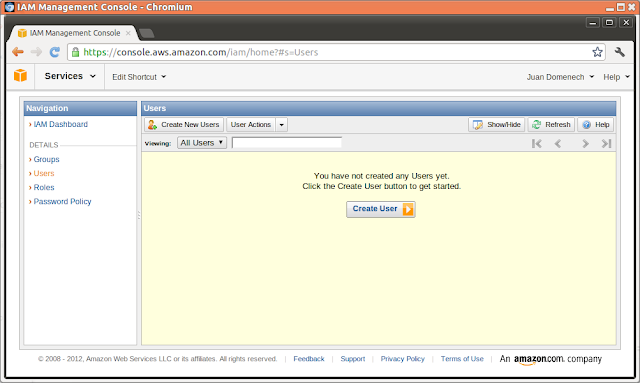
In this case we are creating the user "newvem" and giving it full read access to our AWS set up using the IAM new user creating wizard.
Create user:
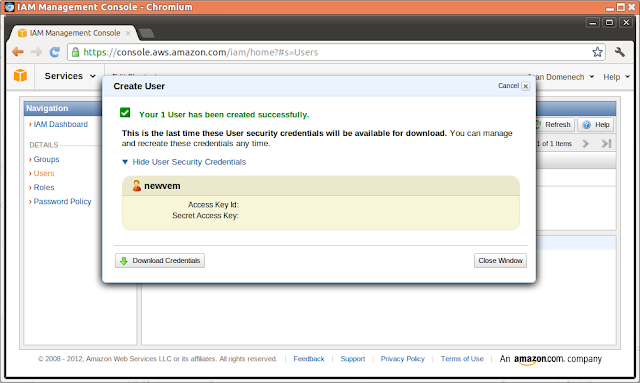
User: newvem
Download the recently created Security Credentials for this user:
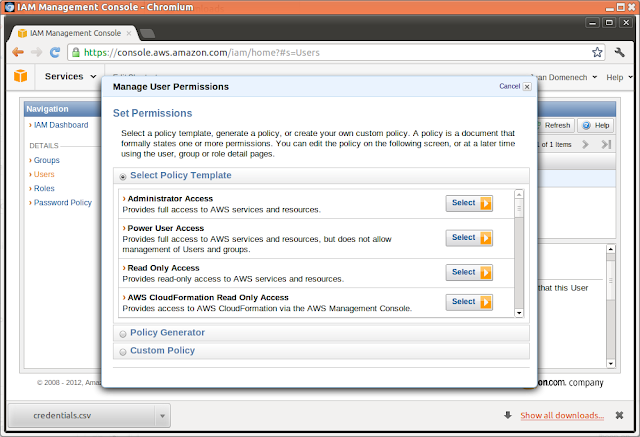
Choose Read Only Access template for this user:
Apply:
Those are the default granted permissions. We now have the option to tune them a bit in the future if needed:
| { "Statement": [ { "Action": [ "autoscaling:Describe*", "cloudformation:DescribeStacks", "cloudformation:DescribeStackEvents", "cloudformation:DescribeStackResources", "cloudformation:GetTemplate", "cloudfront:Get*", "cloudfront:List*", "cloudwatch:Describe*", "cloudwatch:Get*", "cloudwatch:List*", "dynamodb:GetItem", "dynamodb:BatchGetItem", "dynamodb:Query", "dynamodb:Scan", "dynamodb:DescribeTable", "dynamodb:ListTables", "ec2:Describe*", "elasticache:Describe*", "elasticbeanstalk:Check*", "elasticbeanstalk:Describe*", "elasticbeanstalk:List*", "elasticbeanstalk:RequestEnvironmentInfo", "elasticbeanstalk:RetrieveEnvironmentInfo", "elasticloadbalancing:Describe*", "iam:List*", "iam:Get*", "route53:Get*", "route53:List*", "rds:Describe*", "s3:Get*", "s3:List*", "sdb:GetAttributes", "sdb:List*", "sdb:Select*", "ses:Get*", "ses:List*", "sns:Get*", "sns:List*", "sqs:GetQueueAttributes", "sqs:ListQueues", "sqs:ReceiveMessage", "storagegateway:List*", "storagegateway:Describe*" ], "Effect": "Allow", "Resource": "*" } ] } |
Labels:
Amazon Web Services,
AWS,
credentials,
IAM,
Newvem,
permissions,
read-only,
user
Tuesday, June 12, 2012
AWS Diagrams Palette V1.0
Update! Now you can download my first collection of AWS Diagrams Objects to use them on your own diagrams. Check this out!
This is the current objects palette I'm using when creating my Amazon Web Services infrastructure diagrams.
Update! Now you can download my first collection of AWS Diagrams Objects to use them on your own diagrams. Check this out!
Friday, June 8, 2012
IPv6 Security: Back to square one?
After enjoying with a IPv6 "Hello World!" and surfing IPv6 a bit during the IPv6 World Launch I've notice something while reading some IPv6 configuration guides available around for Unix. Let me see... Interface definition, tunnel creation, end-point IP, DNS, etc. Everything seems in order but something is missing: The firewall!
With all that rush to set up our new IPv6 connection and after all that time working behind a NAT connection we didn't pay attention to that important element and some machines are plugged-in wide open.
Are just a couple of poorly configured systems or a epidemic? Let's scan the network "old style". Any sequential IPv6 scan approach is not viable due the size of the IPv6 range (2^128) so I took an IP list from this IPv6 database http://flyr.info/ . From there I've got 16839 unique IPv6 addresses. A good sample to test.
With the nc Linux command, the IP list and a loop we have a low cost IP scanner:
Scan result: From 16839 scanned IPs:
6660 machines with Port TCP 22 SSH open
53 machines with Port TCP 5900 VNC open
181 machines with Port TCP 3389 Windows Remote Desktop open
and the list goes on...
I know, some of those machines have those ports open on purpose. But when you see something like these nmap scan results you realise that these are computers without any IP filtering active. And this is not good.
With all that rush to set up our new IPv6 connection and after all that time working behind a NAT connection we didn't pay attention to that important element and some machines are plugged-in wide open.
Are just a couple of poorly configured systems or a epidemic? Let's scan the network "old style". Any sequential IPv6 scan approach is not viable due the size of the IPv6 range (2^128) so I took an IP list from this IPv6 database http://flyr.info/ . From there I've got 16839 unique IPv6 addresses. A good sample to test.
With the nc Linux command, the IP list and a loop we have a low cost IP scanner:
| #!/bin/bash while read ip; do nc -6zv -w 1 $ip $1 done < "list" |
Scan result: From 16839 scanned IPs:
6660 machines with Port TCP 22 SSH open
53 machines with Port TCP 5900 VNC open
181 machines with Port TCP 3389 Windows Remote Desktop open
and the list goes on...
I know, some of those machines have those ports open on purpose. But when you see something like these nmap scan results you realise that these are computers without any IP filtering active. And this is not good.
| # nmap -6 2001:**:**:**::** Starting Nmap 6.00 ( http://nmap.org ) at 2012-06-08 00:48 CEST Nmap scan report for ****.******.cr (2001:**:**:**::**) Host is up (0.22s latency). Not shown: 972 closed ports PORT STATE SERVICE 22/tcp open ssh 25/tcp open smtp 53/tcp open domain 80/tcp open http 88/tcp open kerberos-sec 143/tcp open imap 311/tcp open asip-webadmin 389/tcp open ldap 443/tcp open https 445/tcp open microsoft-ds 464/tcp open kpasswd5 548/tcp open afp 587/tcp open submission 625/tcp open apple-xsrvr-admin 636/tcp open ldapssl 749/tcp open kerberos-adm 993/tcp open imaps 2000/tcp open cisco-sccp 5222/tcp open xmpp-client 5269/tcp open xmpp-server 5900/tcp open vnc 8088/tcp open radan-http 9999/tcp filtered abyss Nmap done: 1 IP address (1 host up) scanned in 27.74 seconds |
| # nmap -6 2607:**:**:**::** Starting Nmap 6.00 ( http://nmap.org ) at 2012-06-08 09:04 CEST Nmap scan report for ****.******.com (2607:**:**:**::**) Host is up (0.24s latency). Not shown: 973 closed ports PORT STATE SERVICE 21/tcp open ftp 22/tcp open ssh 25/tcp open smtp 26/tcp open rsftp 53/tcp open domain 79/tcp open finger 80/tcp open http 88/tcp open kerberos-sec 110/tcp open pop3 143/tcp open imap 389/tcp open ldap 443/tcp open https 515/tcp open printer 548/tcp open afp 631/tcp open ipp 636/tcp open ldapssl 993/tcp open imaps 995/tcp open pop3s 1025/tcp open NFS-or-IIS 5900/tcp open vnc 10001/tcp open scp-config Nmap done: 1 IP address (1 host up) scanned in 45.27 seconds |
| # nmap -6 2a02:**:**:**::** Starting Nmap 6.00 ( http://nmap.org ) at 2012-06-08 08:59 CEST Nmap scan report for 2a02:**:**:**::** Host is up (0.11s latency). Not shown: 981 closed ports PORT STATE SERVICE 80/tcp open http 135/tcp open msrpc 445/tcp open microsoft-ds 554/tcp open rtsp 1433/tcp open ms-sql-s 3389/tcp open ms-wbt-server 49152/tcp open unknown 49153/tcp open unknown 49154/tcp open unknown 49155/tcp open unknown 49156/tcp open unknown 49157/tcp open unknown 49158/tcp open unknown Nmap done: 1 IP address (1 host up) scanned in 15.75 seconds |
Friday, June 1, 2012
IPv6 Hello World!
First, deploy one EC2 instance. I always use the default Amazon Linux 64bits AMI. I'm used to RedHat and CentOS Linux and this AMI is basically the same. Then install your favourite web server flavour. This instance will have an IPv4 address and that's all we need. The magic for IPv6 is at the ELB public side. There's no way (and and no need now) to get an IPv6 attached to your instance.
Once that is done, deploy an ELB and attach the instance to it. Notice on the ELB "Description" tab that you have 3 DNS records for it.
In may case:
domenech-1821931935.us-east-1.elb.amazonaws.com (A Record)
ipv6.domenech-1821931935.us-east-1.elb.amazonaws.com (AAAA Record) dualstack.domenech-1821931935.us-east-1.elb.amazonaws.com (A or AAAA Record) |
Let's give a detailed look to it. The first DNS record (A Record) is the typical IPv4 record where you usually point the CNAME to.
# host domenech-1821931935.us-east-1.elb.amazonaws.com
root@juan-ubuntu:~# host ipv6.domenech-1821931935.us-east-1.elb.amazonaws.comdomenech-1821931935.us-east-1.elb.amazonaws.com has address 23.21.124.217 ipv6.domenech-1821931935.us-east-1.elb.amazonaws.com has IPv6 address 2406:da00:ff00::1715:7cd9 |
So, if we resolve the A Record we get a IPv4 (23.21.124.217 in my example) and with the AAAA Record we get the IPv6 (2406:da00:ff00::1715:7cd9). They are there waiting for us to use them. No more configuration needed.
Searching this IP in this BGP AS database we get that it belongs to the Autonomous System AS16509 prefix 2406:da00::/32 from Amazon.com. In other words, part of the AWS IPv6 infrastructure. Those 32 bits prefix mean that are 96 bits of IP addresses available (IPv6=128bits) into that prefix and that is 79,228,162,510,000,000,000,000,000,000 IPs. Nice!
Another interesting thing is that the AAAA Record "implies" the A Record. An IPv6 is formed by 8 "hexquads" 16 bit long each one separated by colons and written in lower case hexadecimal. Double colon (::) means "full of zeros". In my example, the IPv6 2406:da00:ff00::1715:7cd9 translates to 2406:da00:ff00:0000:0000:0000:1715:7cd9. If we take the last 8 hexadecimal elements grouped by 2 and convert to decimal:
17 = 23
15 = 21
7c = 124
d9 = 217 |
Now we have just to create our CNAME record for our domain pointing to the AWS ELB. We can either choose the AAAA Record or the "dualstack" (A and AAAA) Record. Basically the Dual Stack record answers a IPv4 IP if our DNS call asks for a A Record or a AAAA Record in that case.
Dig for A Record:
| # dig ipv6.domenech.org A @2001:4860:4860::8888 ; <<>> DiG 9.8.1-P1 <<>> ipv6.domenech.org A @2001:4860:4860::8888 ;; global options: +cmd ;; Got answer: ;; ->>HEADER<<- opcode: QUERY, status: NOERROR, id: 56239 ;; flags: qr rd ra; QUERY: 1, ANSWER: 2, AUTHORITY: 0, ADDITIONAL: 0 ;; QUESTION SECTION: ;ipv6.domenech.org. IN A ;; ANSWER SECTION: ipv6.domenech.org. 60 IN CNAME dualstack.domenech-1821931935. dualstack.domenech-1821931935. ;; Query time: 216 msec ;; SERVER: 2001:4860:4860::8888#53(2001: ;; WHEN: Tue Jun 5 11:58:20 2012 ;; MSG SIZE rcvd: 122 |
Dig for AAAA Record:
# dig ipv6.domenech.org AAAA @2001:4860:4860::8888
; <<>> DiG 9.8.1-P1 <<>> ipv6.domenech.org AAAA @2001:4860:4860::8888 ;; global options: +cmd ;; Got answer: ;; ->>HEADER<<- opcode: QUERY, status: NOERROR, id: 56671 ;; flags: qr rd ra; QUERY: 1, ANSWER: 2, AUTHORITY: 0, ADDITIONAL: 0 ;; QUESTION SECTION: ;ipv6.domenech.org. IN AAAA ;; ANSWER SECTION: ipv6.domenech.org. 57 IN CNAME dualstack.domenech-1821931935. dualstack.domenech-1821931935. ;; Query time: 123 msec ;; SERVER: 2001:4860:4860::8888#53(2001: ;; WHEN: Tue Jun 5 11:58:23 2012 ;; MSG SIZE rcvd: 134 |
Note: 2001:4860:4860::8888 is a Google IPv6 DNS Server.
This duality is something we have to keep in mind when testing IPv6. We have to be certain whether our browser will ask for a IPv6 Record or not.
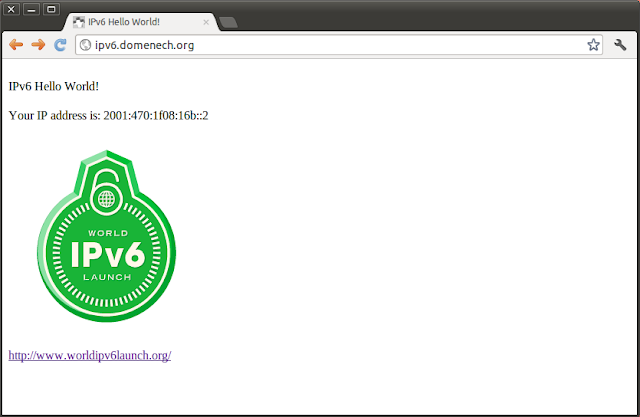
And basically that's it. With the EC2 instance up, the web site up and our CNAME ready in our DNS server (I used http://ipv6.domenech.org) you just need to open a browser and type the URL.
Ta-raaaaa!
Appendix.
IP Source: Do not expect to read IPv6 in your Apache log files. All the communication between the ELB and EC2 is IPv4. By default all your connections to your instance will come from the ELB internal IP (something like 10.28.x.x) and this is what you will get at the logs. To reflect your clients IP in your log files instead the ELB IP you need to change the default Apache configuration adding %{X-Forwarded-For}i to your LogFormat. And to make present this information at your application you need to read the HTTP_X_FORWARDED_FOR header provided by the ELB. The best way to start dealing with headers is to create a PHP test page and read all the headers that come with every request. Don't forget to delete this page when is no longer needed to avoid giving away too much information.
Labels:
AAAA,
Amazon Web Services,
Autonomous System,
AWS,
DNS,
EC2,
ELB,
HTTP_X_FORWARDED_FOR,
IPv6
Surfing with IPv6
My DSL carrier (and as far I know no Spanish ADSL carriers) has IPv6 available so my only chance to join IPv6 Launch Day is to create a tunnel to a IPv6 service provider. I've choose the well known Hurricane Electric Tunnel Broker free service.
Easy steps using Ubuntu:
- Sign-in.
- Create your tunnel connection towards your public IPv4 address (Note: You will need to allow HE to ping your router in your firewall configuration).
- Configuration following this guide: http://davecoyle.com/documents/ubuntu-ipv6-he-tunnel.html
- Add the IPv6 DNS server at your /etc/resolv.conf file. In this cases is: nameserver 2001:470:20::2
My suggestion, and for the sake of the test, is to use only this DNS server.
And test!
How my IPv6 tunnel interface looks like:
# ifconfig he-ipv6
he-ipv6 Link encap:IPv6-in-IPv4 inet6 addr: 2001:470:1f08:16b::2/64 Scope:Global UP POINTOPOINT RUNNING NOARP MTU:1480 Metric:1 RX packets:24393 errors:0 dropped:0 overruns:0 frame:0 TX packets:15097 errors:0 dropped:0 overruns:0 carrier:0 collisions:0 txqueuelen:0 RX bytes:30140949 (30.1 MB) TX bytes:1460976 (1.4 MB) |
And the local interface. Now we have the new localhost IPv6 address ::1 (In IPv6 this is the equivalent of 127.0.0.1).
lo Link encap:Local Loopback
inet addr:127.0.0.1 Mask:255.0.0.0 inet6 addr: ::1/128 Scope:Host UP LOOPBACK RUNNING MTU:16436 Metric:1 RX packets:1043 errors:0 dropped:0 overruns:0 frame:0 TX packets:1043 errors:0 dropped:0 overruns:0 carrier:0 collisions:0 txqueuelen:0 RX bytes:105946 (105.9 KB) TX bytes:105946 (105.9 KB) |
First, ping my interface (notice that I'm using ping6 command):
# ping6 -c 5 2001:470:1f08:16b::2
PING 2001:470:1f08:16b::2(2001:470: 64 bytes from 2001:470:1f08:16b::2: icmp_seq=1 ttl=64 time=0.033 ms 64 bytes from 2001:470:1f08:16b::2: icmp_seq=2 ttl=64 time=0.048 ms 64 bytes from 2001:470:1f08:16b::2: icmp_seq=3 ttl=64 time=0.062 ms 64 bytes from 2001:470:1f08:16b::2: icmp_seq=4 ttl=64 time=0.047 ms 64 bytes from 2001:470:1f08:16b::2: icmp_seq=5 ttl=64 time=0.032 ms --- 2001:470:1f08:16b::2 ping statistics --- 5 packets transmitted, 5 received, 0% packet loss, time 3996ms rtt min/avg/max/mdev = 0.032/0.044/0.062/0.012 ms |
Then, ping the other side of the tunnel (notice the round trip time change):
| # ping6 -c 5 2001:470:1f08:16b::1 PING 2001:470:1f08:16b::1(2001:470: 64 bytes from 2001:470:1f08:16b::1: icmp_seq=1 ttl=64 time=66.7 ms 64 bytes from 2001:470:1f08:16b::1: icmp_seq=2 ttl=64 time=66.5 ms 64 bytes from 2001:470:1f08:16b::1: icmp_seq=3 ttl=64 time=66.5 ms 64 bytes from 2001:470:1f08:16b::1: icmp_seq=4 ttl=64 time=66.3 ms 64 bytes from 2001:470:1f08:16b::1: icmp_seq=5 ttl=64 time=67.4 ms --- 2001:470:1f08:16b::1 ping statistics --- 5 packets transmitted, 5 received, 0% packet loss, time 4007ms rtt min/avg/max/mdev = 66.309/66.720/67.461/0.460 ms |
And then, my first IPv6 ping to Google :)
# ping6 -c 5 -n ipv6.google.com
64 bytes from 2a00:1450:400d:803::1013: icmp_seq=1 ttl=57 time=167 msPING ipv6.google.com(2a00:1450: 64 bytes from 2a00:1450:400d:803::1013: icmp_seq=2 ttl=57 time=176 ms 64 bytes from 2a00:1450:400d:803::1013: icmp_seq=3 ttl=57 time=170 ms 64 bytes from 2a00:1450:400d:803::1013: icmp_seq=4 ttl=57 time=176 ms 64 bytes from 2a00:1450:400d:803::1013: icmp_seq=5 ttl=57 time=176 ms --- ipv6.google.com ping statistics --- 5 packets transmitted, 5 received, 0% packet loss, time 4006ms rtt min/avg/max/mdev = 167.003/173.506/176.744/3.987 ms |
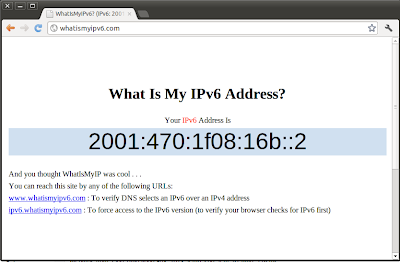
And now is time for a browser and what could be better than http://whatismyipv6.com (IPv6 style of course :)
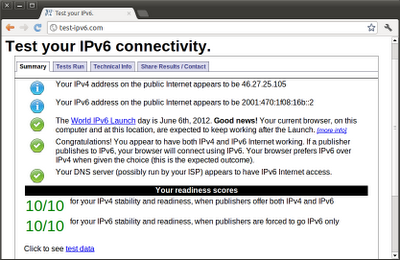
And http://test-ipv6.com
Google redirects me to the UK site although I'm at Spain. That's because among all the tunnels endpoints from Hurricane Electric I've choose the one at London. But there are more. This could become handy later.
A curios ping :)
# ping6 -n -c1 www.v6.facebook.com
PING www.v6.facebook.com(2620:0:1cfe:face:b00c::3) 56 data bytes64 bytes from 2620:0:1cfe:face:b00c::3: icmp_seq=1 ttl=51 time=197 ms --- www.v6.facebook.com ping statistics --- 1 packets transmitted, 1 received, 0% packet loss, time 0ms rtt min/avg/max/mdev = 197.501/197.501/197.501/0.000 ms |
And a couple more:
2a01:4f8:d13:3a43:feed:abba:deca:f www.synchronkartei.de
2001:4cc0:1ff:40:bebe:cafe:bebe:cafe www.webtuga.com
2001:610:148:dead:beef:b00b:cafe:babe www.ist-mome.org
Subscribe to:
Posts (Atom)


