Wednesday, December 31, 2014

How to transfer your DNS configuration to AWS Route 53


These are the steps for a simple DNS migration to AWS Route 53.

For our convenience, we have previously migrated our Internet Domain registration to Route 53 using these instructions (optional).


1- Create Hosted Zone


- On the Route 53 Console, click on "Create Hosted Zone" button.

- Enter your domain name (domenech.org in this example) and press "Create" button.


blog-domenech-org-transfer-your-dns-configuration-to-aws-route-53-create-zone


After a successful creation, the Zone Details will appear on screen and also the Name Servers for our domain. They will play an important role later on.


2- Obtain Zone File


There are three ways to populate our Hosted Zone: Route 53 API, Console and Import Zone File:
  1. Importing a zone using API is for advanced users and is suggested for big DNS configurations. There are some tools out there to facilitate this task (Official documentation).
  2. Importing a zone manually using Route 53 Console is easy but only for small DNS configurations.
  3. Importing a zone using "Import Zone File" option on the Route 53 console is easy but relies on our ability to obtain the list of your current DNS server configuration.
A DNS Zone File is a plain text list of your current DNS configuration with all records and their values.

Import Zone File is the method we are going to use in this example. It ensures that no typos are introduced in the migration process and is a easy repeatable method.

Here below my DNS server configuration obtained from my current ISP using a Plesk Control Panel. There are all sorts of Control Panels and Service Providers. I suggest you to send a support request to your current ISP to get that information.

Zone file:

$ORIGIN domenech.org.
$TTL 1h
*.webmail.domenech.org. CNAME mail.domenech.org.
blog.domenech.org. CNAME ghs.google.com.
domenech.org.      A 46.17.142.13
domenech.org.      MX (10) mail.domenech.org.
domenech.org.      MX (20) relay.celingest.es.
domenech.org.      TXT v=spf1 include:celingest.es a mx ~all
ftp.domenech.org.  CNAME domenech.org.
imap.domenech.org. CNAME mail.domenech.org.
ipv4.domenech.org. CNAME domenech-1821931935.us-east-1.elb.amazonaws.com.
ipv6.domenech.org. CNAME dualstack.domenech-1821931935.us-east-1.elb.amazonaws.com.
mail.domenech.org. A 46.17.142.13
pop.domenech.org.  CNAME mail.domenech.org.
pop3.domenech.org. CNAME mail.domenech.org.
smtp.domenech.org. CNAME mail.domenech.org.
webmail.domenech.org. CNAME mail.domenech.org.
www.domenech.org. CNAME domenech.org.

The file format is simple: Three columns with DNS entry name + entry type + values separated by spaces.

Notice the two special fields at the beginning of the list: $ORIGIN and $TTL. I had to introduce them manually.

$ORIGIN is our Internet Domain Name followed by "."

$TTL 1h is the default TTL we plan to use for each entry. You can easily change that value later for individual entries using the console where necessary.

No SOA or NS records: They have to be deleted from our list. They are already present in the Hosted Zone configuration.


3- Import Zone File


- Select the newly created Zone and click on "Go to Records Sets" button.

- Click on "Import Zone File" button and Paste the contents of your Zone File.

blog-domenech-org-transfer-your-dns-configuration-to-aws-route-53-file-import


- Press "Import" button.

blog-domenech-org-transfer-your-dns-configuration-to-aws-route-53-zone-file-import-succesfull

You will get a successful message after a couple of seconds. Otherwise, the console will tell you what was the error and on which line number was produced.


3- Test


The new Hosted Zone and their DNS entries are ready to use.

This is a concept that could be difficult to wrap our head around it: Route 53 is replicating all those changes in realtime across our DNS servers and this configuration is ready to use by anyone.

But, we haven't changed our Internet Domain configuration and therefore no one is connecting to our new DNS servers. That gives us a chance to properly test the transfer result before going Live.


Where are my new DNS servers?

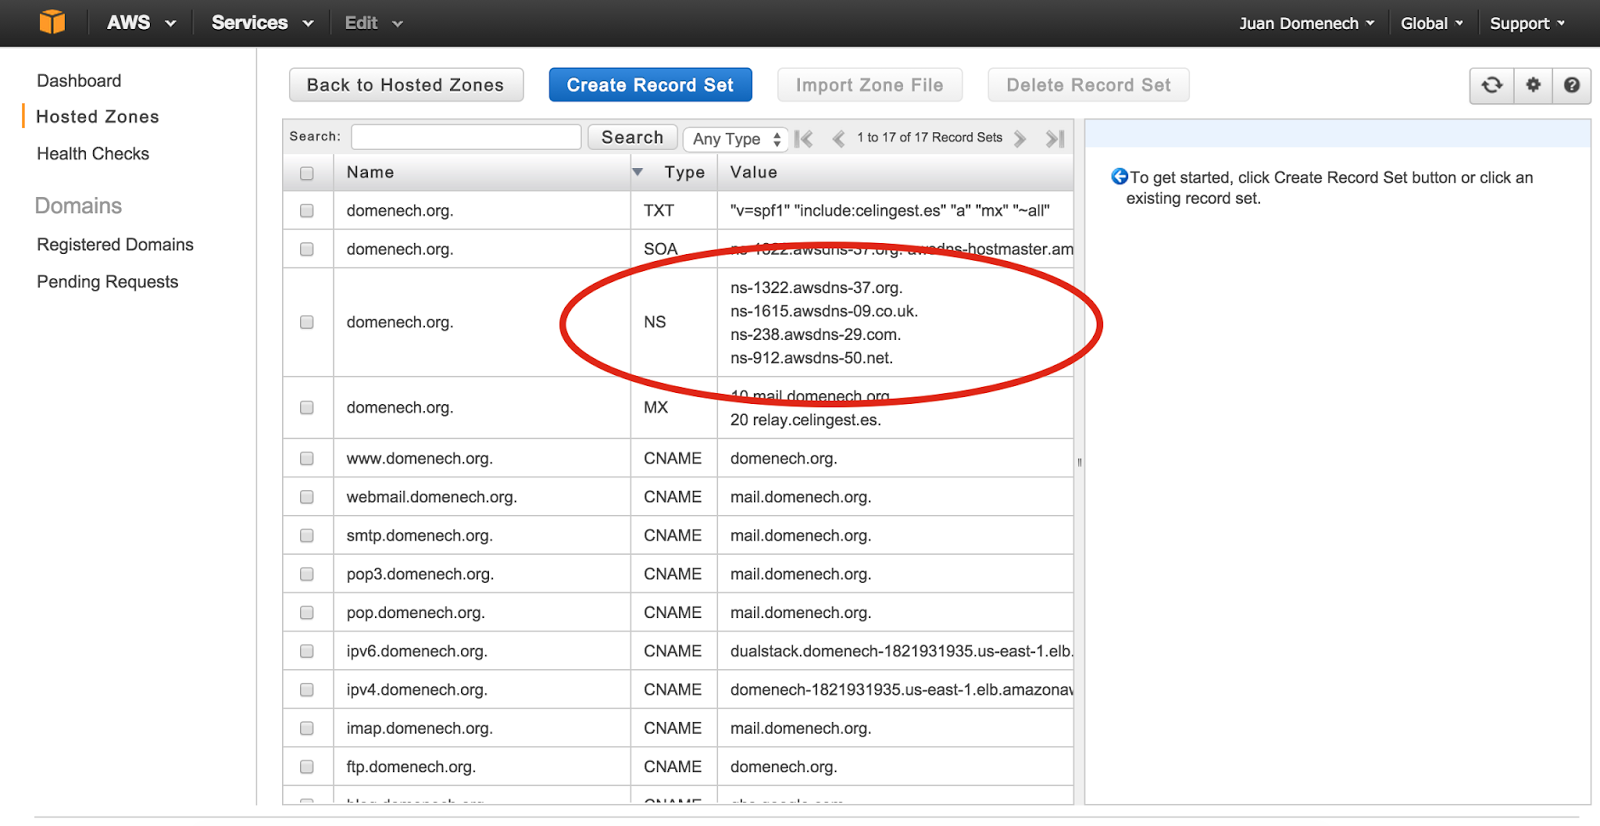
Open your Hosted Zone using Route 53 console. Your new DNS servers for are under the Type: NS.

blog-domenech-org-transfer-your-dns-configuration-to-aws-route-53-zone-file-import-succesfull-result


Use dig command to query your "old" and your "new" DNS servers and compare the result.

First, lets send the request to Internet to get our current Live configuration:

$ dig mail.domenech.org

; <<>> DiG 9.8.3-P1 <<>> mail.domenech.org
;; global options: +cmd
;; Got answer:
;; ->>HEADER<<- opcode: QUERY, status: NOERROR, id: 46712
;; flags: qr rd ra; QUERY: 1, ANSWER: 1, AUTHORITY: 0, ADDITIONAL: 0

;; QUESTION SECTION:
;mail.domenech.org. IN A

;; ANSWER SECTION:
mail.domenech.org. 59 IN A 46.17.142.13


In this example the DNS query was "mail.domenech.org" and the answer is IP 46.17.142.13

Next we perform the same query but this time we instruct dig to ask only to one of our new DNS servers (previously obtained from the Console):

$ dig mail.domenech.org @ns-1322.awsdns-37.org

; <<>> DiG 9.8.3-P1 <<>> mail.domenech.org @ns-1322.awsdns-37.org
;; global options: +cmd
;; Got answer:
;; ->>HEADER<<- opcode: QUERY, status: NOERROR, id: 64064
;; flags: qr aa rd; QUERY: 1, ANSWER: 1, AUTHORITY: 4, ADDITIONAL: 0
;; WARNING: recursion requested but not available

;; QUESTION SECTION:
;mail.domenech.org. IN A

;; ANSWER SECTION:
mail.domenech.org. 3600 IN A 46.17.142.13

;; AUTHORITY SECTION:
domenech.org. 172800 IN NS ns-1322.awsdns-37.org.
domenech.org. 172800 IN NS ns-1615.awsdns-09.co.uk.
domenech.org. 172800 IN NS ns-238.awsdns-29.com.
domenech.org. 172800 IN NS ns-912.awsdns-50.net.


The answer is a bit different but the key value, the IP address, is the same. That indicates that this DNS entry has been successfully transferred.

Also notice that the TTL is 59 seconds in the first query and 3600 seconds (1h) in the second query. That is because we have specified $TTL 1h in our Zone File and all the imported entries in Route 53 have this default value. You could change it on each entry manually using the Console or repeat the import process again with a different default TTL value.


4- Rollback plan before changing Live configuration


On the next step we will change our Internet Domain DNS configuration and tell Internet to use our new DNS servers. Before doing that it is suggested to lower our NS entry TTL to 1 hour.

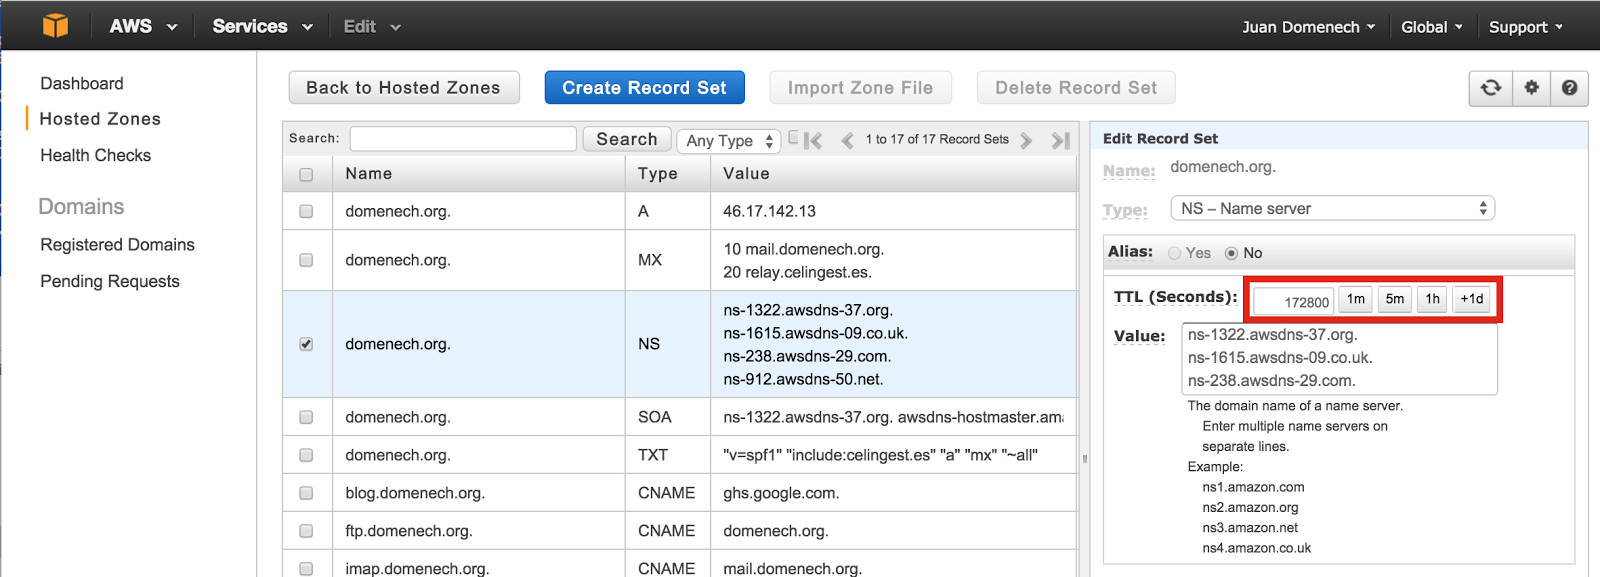
- Access to your Hosted Zone, select the NS entry for your domain and click on the 1h Hour button (the value will be translated to 3600 seconds) and click on "Save Record Set" button.

blog-domenech-org-transfer-your-dns-configuration-aws-route-53-type-ns-ttl-hour-day


This instructs other DNS servers connecting to ours to come back an hour later in order to find out if the Route 53 DNS servers are still valid. This give us the option to undo this configuration in the case something goes wrong. In the worst case scenario, the issue will last an hour (the TTL value).


5- Change Internet Domain configuration and bring Route 53 Live


This is the step where all the previous configuration is set in motion.

- Access to Route 53 Registered Domains, select the Internet Domain we plan to modify and click on "Add/Edit Name Servers".

blog-domenech-org-transfer-your-dns-configuration-aws-route-53-change-servers


- Write down the current DNS servers list in order to rollback this change if necessary.

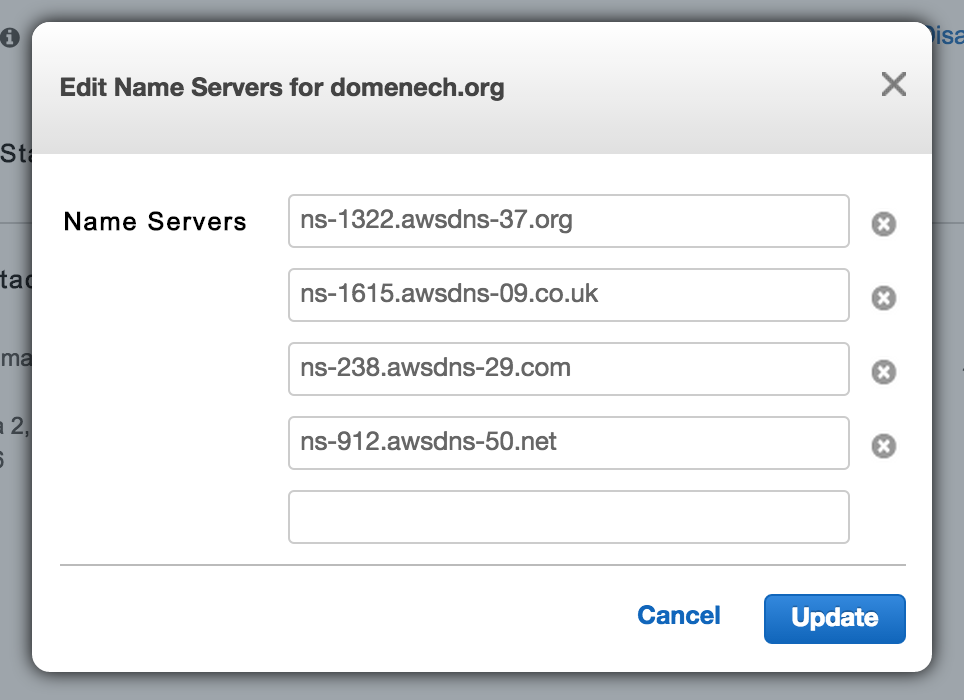
- Introduce your new DNS servers obtained on step #3 (These shown here below are and example. Your servers names will probably differ) and click on the "Update" button.

blog-domenech-org-transfer-your-dns-configuration-aws-route-53-configure-servers


blog-domenech-org-transfer-your-dns-configuration-aws-route-53-servers-changed-receive-email


A couple of minutes later (depending on the TTL set up on your former DNS servers) the change can be tested using dig.


$ dig domenech.org NS

; <<>> DiG 9.8.3-P1 <<>> domenech.org NS
;; global options: +cmd
;; Got answer:
;; ->>HEADER<<- opcode: QUERY, status: NOERROR, id: 29759
;; flags: qr rd ra; QUERY: 1, ANSWER: 4, AUTHORITY: 0, ADDITIONAL: 0

;; QUESTION SECTION:
;domenech.org. IN NS

;; ANSWER SECTION:
domenech.org. 3600 IN NS ns-1615.awsdns-09.co.uk.
domenech.org. 3600 IN NS ns-912.awsdns-50.net.
domenech.org. 3600 IN NS ns-1322.awsdns-37.org.
domenech.org. 3600 IN NS ns-238.awsdns-29.com.


The new Route 53 servers are there and being used by anyone connection to our Internet Domain.


6- Post configuration tasks


Once we are happy and with everything tested we could bring up the TTL values. A higher TTL will improve our users experience and reduce Route 53 cost.

- Access to the NS entry and click twice on the "1d button" to select 172800 seconds (2 days).

blog-domenech-org-transfer-your-dns-configuration-aws-route-53-type-ns-ttl-standard-value


7- Rollback


In case something went wrong we could set our former DNS servers in the Internet Domain configuration. Repeat step #5 but this time select your old DNS server list. This will bring your DNS configuration to the initial point once the TTL expires (1 hour in this example).


Tuesday, December 30, 2014

Certificación de Amazon Web Services: SysOps Administrator - Associate


AWS-Certified-SysOps-Administrator-Associate


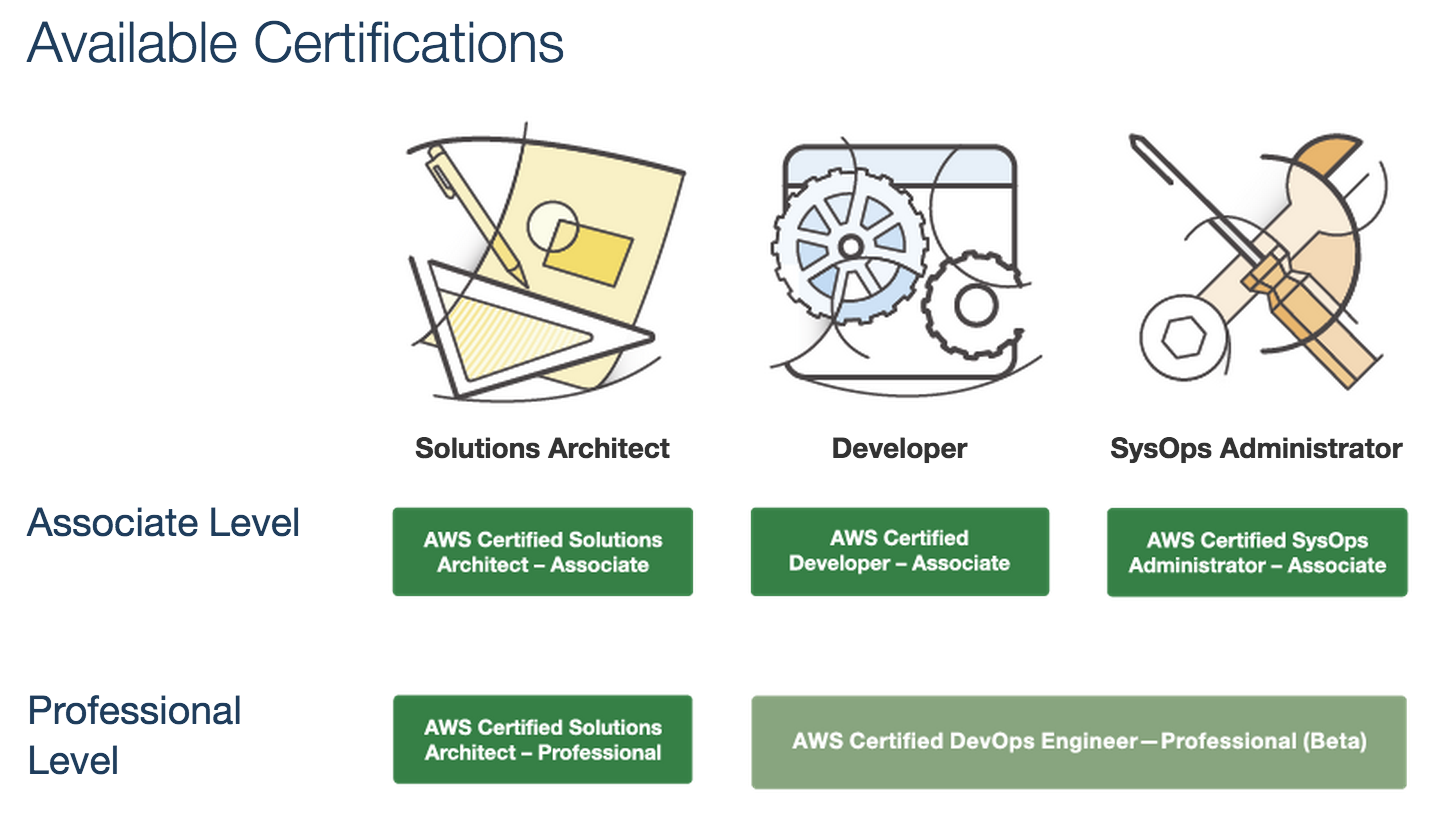
En el pasado Re:Invent 2014 tuve la oportunidad de obtener mi segunda certificación de AWS: SysOps Administrator - Associate y de realizar la beta de la nueva certificación: AWS DevOps Engineer - Professional.


En el último año el roadmap ha cambiado sustancialmente:

blog-domenech-org-aws-certification-roadmap-2015


Novedades:


- Ya no se menciona la posibilidad de obtener una certificación de nivel Master (a diferencia del año pasado).

- El nivel Professional de Developer y SysOps se extingue para fusionarse en una sola certificación: AWS Certified DevOps Engineer - Professional.


Examen para AWS Certified SysOps Administrator - Associate


Os invito a intentarlo. Incluso para ingenieros cuyo cometido es mayoritariamente trabajo de sistemas y que aun no se han puesto al día en scripting, OpsWorks y Cloud Formation. Es un examen asequible.

Mi consejo es utilizar nuestra cuenta de Kryterion (la que obtuvimos para examinarnos de Solution Architect) y contratar un examen de prueba por $20 para averiguar en que nivel nos encontramos.


Nueva certificación AWS Certified DevOps Engineer - Professional


La beta estuvo disponible en Re:Invent 2014 y ahora debemos esperar a que la versión final sea lanzada, probablemente en Marzo 2015. Durante el proceso de beta, AWS prueba el examen con un nutrido grupo de usuarios de servicios AWS y empleados de la compañía con el fin de averiguar la nota de corte y las preguntas que son confusas o causan quejas de los examinados. Con esa información se elabora el examen final y se ofrece, más tarde, al público.

Es un examen difícil, como corresponde a un nivel Professional. Pero con el actual roadmap no cabe duda que debemos prepararnos para esta certificación si queremos seguir progresando como especialistas en la tecnología de AWS. Esperaremos al lanzamiento final para conocer el contenido final de esta certificación y que los servicios de ayuda on-line se pongan al día.

Nota: Para poder optar a esta certificación existe el requisito previo de estar en posesión de una certificación activa de Certified Developer o de Certified SysOps. Estas certificaciones expiran a los dos años de ser obtenidas. Tened esto en cuenta para vuestros planes de certificación.


Monday, December 29, 2014

How to transfer your Internet Domain to AWS Route 53


tranfer-domain-to-aws-route-53-icon

These are the steps to transfer an Internet domain (domenech.org in this example) to AWS Route 53.

This is not a DNS configuration migration. This is only to make AWS our Domain registrar

1- Check your current domain registration information


Make sure that your contact details are up to date and that you have all you need to administer your domain configuration (valid email addresses, the domain is not about to expire, the domain is not locked, etc.)


2- Request the Authorisation Code to your current Registrar


The goal of the whole process is to transfer the registrar authority from one registrar (your current) to a new one (AWS). The method to authenticate that this is an authorised request is the Authorisation Code. 

Each provider has a different method to obtain this code. I.e: These are the instructions for GoDaddy


3- Initiate the Transfer Domain Wizard


- On the Route 53 Console: Click on "Registered Domains" and "Transfer Domain" button.

- Type your Internet Domain name and select its TLD (domenech.org in this case).

blog-domenech-org-transfer-internet-domain-to-aws-route-53-step-3

4- Authorisation Code and your current DNS server


Enter here the Authorisation Code you have received from your current Registrar.

Enter here your current DNS servers names. There is room for 4 server but 2 servers is the minimum required.

Remember: These are your current DNS servers. No change here. We are migrating only the Internet Domain registrar of your domain.


blog-domenech-org-transfer-internet-domain-to-aws-route-53-step-4


5- Fulfil your contact details


blog-domenech-org-transfer-internet-domain-to-aws-route-53-step-5

6- Review & Purchase


blog-domenech-org-transfer-internet-domain-to-aws-route-53-step-6a


blog-domenech-org-transfer-internet-domain-to-aws-route-53-step-6b

7- noreply@domainnameverification.net email


The process has been initiated and now should be on pending status.
You can track it on the Route 53 Console Dashboard:

blog-domenech-org-transfer-internet-domain-to-aws-route-53-step-dashboard-7a


After a couple of days you will receive an email from noreply@domainnameverification.net asking you to approve the transfer. Follow those instructions.

blog-domenech-org-transfer-internet-domain-to-aws-route-53-step-domainnameverification.net-7b


blog-domenech-org-transfer-internet-domain-to-aws-route-53-step-approve-transfer-8


8- Done. Your Internet Domain is now under Amazon Web Services control


blog-domenech-org-transfer-internet-domain-to-aws-route-53-step-registered-domains-9


9- Test


A good way to test that Internet got it right is to perform a "Who Is" from a public service like http://www.whois.net and query your domain.

Here below the current output of that query for domenech.org. Notice that my personal details are obfuscated by a third party registrar. AWS has delegated the domain registration to http://www.gandi.net/whois and this service includes information obfuscation without any additional cost.

Domain Name:DOMENECH.ORG
Domain ID: D85970450-LROR
Creation Date: 2002-04-25T19:34:26Z
Updated Date: 2014-10-25T00:20:22Z
Registry Expiry Date: 2016-04-25T19:34:26Z
Sponsoring Registrar:Gandi SAS (R42-LROR)
Sponsoring Registrar IANA ID: 81
WHOIS Server: 
Referral URL: 
Domain Status: clientTransferProhibited
Registrant ID:JD10503-GANDI
Registrant Name:Juan Domenech
Registrant Organization:
Registrant Street: Whois Protege / Obfuscated whois
Registrant Street: Gandi, 63-65 boulevard Massena
Registrant City:Paris
Registrant State/Province:
Registrant Postal Code:75013
Registrant Country:FR
Registrant Phone:+33.170377666
Registrant Phone Ext: 
Registrant Fax: +33.143730576
Registrant Fax Ext: 
Registrant Email:a517c25f3bd3ea62979ed4e973f86c48-2042264@contact.gandi.net
Admin ID:JD10502-GANDI
Admin Name:Juan Domenech
Admin Organization:
Admin Street: Whois Protege / Obfuscated whois
Admin Street: Gandi, 63-65 boulevard Massena
Admin City:Paris
Admin State/Province:
Admin Postal Code:75013
Admin Country:FR
Admin Phone:+33.170377666
Admin Phone Ext: 
Admin Fax: +33.143730576
Admin Fax Ext: 
Admin Email:254445e386172ccaea82940961ab1cf2-2042260@contact.gandi.net
Tech ID:JD10504-GANDI
Tech Name:Juan Domenech
Tech Organization:
Tech Street: Whois Protege / Obfuscated whois
Tech Street: Gandi, 63-65 boulevard Massena
Tech City:Paris
Tech State/Province:
Tech Postal Code:75013
Tech Country:FR
Tech Phone:+33.170377666
Tech Phone Ext: 
Tech Fax: +33.143730576
Tech Fax Ext: 
Tech Email:0d4fec3c29117f4dd0034f2b144b1ee4-2042268@contact.gandi.net
Name Server:NS1.CELINGEST.ES
Name Server:NS2.CELINGEST.ES
Name Server:NS3.CELINGEST.ES
Name Server: 
Name Server: 
Name Server: 
Name Server: 
Name Server: 
Name Server: 
Name Server: 
Name Server: 
Name Server: 
Name Server: 
DNSSEC:Unsigned

Tuesday, April 8, 2014

Install Official Bitcoin Wallet On AWS EC2 Linux AMI (or RedHat / CentOS)


This article is now obsolete.
Please refer to the newer version:


Update 2014-04-09: Using bitcoin-0.9.1 with Heartbleed patch.

You should know that RedHat, CentOS or Amazon Linux AMI are not the best choice when it comes to use Bitcoin wallet or other Bitcoin related activities. If you are looking for the easy path you should use Ubuntu Linux or Microsoft Windows as platform. The community is much bigger there.

But if you are determined like me to have your Bitcoin Wallet in the Cloud here you have some instructions. They apply to RedHat and its branches like AWS Linux AMI and CentOS.

Launch a EC2 Instance using Amazon Linux AMI HVM. In this example is ami-b521dfc2 (Ireland). I suggest to use the HVM version to maintain compatibility among different EC2 Instance Types.

All command are executed using ec2-user


Update & Reboot


sudo yum update
sudo reboot


PU_IAS6 Repository & Berkeley DB4.8

We will need Berkeley DB 4.8 but our OS comes with 4.7. Let's use PUIAS repository to get the RPMs with need.
Create the repository config file /etc/yum.repos.d/puias-computational.repo and paste into it the repository definition.


sudo vim /etc/yum.repos.d/puias-computational.repo


[puias-computational]
name=PUIAS Computational
baseurl=http://puias.math.ias.edu/data/puias/computational/6/x86_64/
enabled=1
gpgcheck=0


sudo yum install db48 db48-devel


Boost-Devel


sudo yum install boost-devel


OpenSSL

We need Elliptic Curve Encryption for Bitcoin to work. For some reason it is missing in RHEL distributions. We have to patch around that.

Download & Install OpenSSL source


wget https://www.openssl.org/source/openssl-1.0.1f.tar.gz
tar xvfz openssl-1.0.1f.tar.gz
cd openssl-1.0.1f
export CFLAGS="-fPIC"
./config shared


Disable man pages


vim Makefile


Locate a line with this content "install: all install_docs install_sw" (Line #543) and remove "install_docs" command from it.
The final result should look like this:

...
...
...
        @$(MAKE) TAR='$(TAR)' TARFLAGS='$(TARFLAGS)' tar

dist_pem_h:
        (cd crypto/pem; $(MAKE) -e $(BUILDENV) pem.h; $(MAKE) clean)

install: all install_sw

install_sw:
        @$(PERL) $(TOP)/util/mkdir-p.pl $(INSTALL_PREFIX)$(INSTALLTOP)/bin \
                $(INSTALL_PREFIX)$(INSTALLTOP)/$(LIBDIR) \
...
...
...

Make & Install


make depend
make all
sudo -E make install


If we are errors free, continue copying the following files:


sudo cp /usr/local/ssl/lib/pkgconfig/libssl.pc /usr/lib64/pkgconfig/
sudo cp /usr/local/ssl/lib/pkgconfig/libcrypto.pc /usr/lib64/pkgconfig/

sudo cp /usr/local/ssl/lib/libssl.so.1.0.0 /usr/lib64/
sudo cp /usr/local/ssl/lib/libcrypto.so.1.0.0 /usr/lib64/

cd


Bitcoin

Official Bitcoin download source & Install


cd
wget https://bitcoin.org/bin/0.9.1/bitcoin-0.9.1-linux.tar.gz
tar xvfz bitcoin-0.9.0-linux.tar.gz
cd bitcoin-0.9.0-linux/src/
tar xvfz bitcoin-0.9.0.tar.gz
cd bitcoin-0.9.0/
./configure


If everything goes well you should have and output like this one:

$ ./configure 
checking build system type... x86_64-unknown-linux-gnu
checking host system type... x86_64-unknown-linux-gnu
checking for a BSD-compatible install... /usr/bin/install -c
checking whether build environment is sane... yes
checking for a thread-safe mkdir -p... /bin/mkdir -p
checking for gawk... gawk
checking whether make sets $(MAKE)... yes
checking whether to enable maintainer-specific portions of Makefiles... yes
checking whether make supports nested variables... yes
checking for g++... g++
checking whether the C++ compiler works... yes
checking for C++ compiler default output file name... a.out
checking for suffix of executables... 
checking whether we are cross compiling... no
checking for suffix of object files... o
checking whether we are using the GNU C++ compiler... yes
checking whether g++ accepts -g... yes
checking for style of include used by make... GNU
checking dependency style of g++... gcc3
checking for gcc... gcc
checking whether we are using the GNU C compiler... yes
checking whether gcc accepts -g... yes
checking for gcc option to accept ISO C89... none needed
checking dependency style of gcc... gcc3
checking how to run the C preprocessor... gcc -E
checking how to run the C++ preprocessor... g++ -E
checking for gcc... gcc
checking whether we are using the GNU Objective C compiler... no
checking whether gcc accepts -g... no
checking dependency style of gcc... gcc3
checking for g++... g++
checking whether we are using the GNU Objective C++ compiler... no
checking whether g++ accepts -g... no
checking for a sed that does not truncate output... /bin/sed
checking for ar... /usr/bin/ar
checking for ranlib... /usr/bin/ranlib
checking for strip... /usr/bin/strip
checking for gcov... /usr/bin/gcov
checking for lcov... no
checking for java... /usr/bin/java
checking for genhtml... no
checking for git... no
checking for ccache... no
checking for xgettext... no
checking for hexdump... /usr/bin/hexdump
checking for pkg-config... /usr/bin/pkg-config
checking pkg-config is at least version 0.9.0... yes
checking for grep that handles long lines and -e... /bin/grep
checking for egrep... /bin/grep -E
checking for ANSI C header files... yes
checking for sys/types.h... yes
checking for sys/stat.h... yes
checking for stdlib.h... yes
checking for string.h... yes
checking for memory.h... yes
checking for strings.h... yes
checking for inttypes.h... yes
checking for stdint.h... yes
checking for unistd.h... yes
checking whether byte ordering is bigendian... no
checking if compiler needs -Werror to reject unknown flags... no
checking for the pthreads library -lpthreads... no
checking whether pthreads work without any flags... no
checking whether pthreads work with -Kthread... no
checking whether pthreads work with -kthread... no
checking for the pthreads library -llthread... no
checking whether pthreads work with -pthread... yes
checking for joinable pthread attribute... PTHREAD_CREATE_JOINABLE
checking if more special flags are required for pthreads... no
checking for PTHREAD_PRIO_INHERIT... yes
checking for special C compiler options needed for large files... no
checking for _FILE_OFFSET_BITS value needed for large files... no
checking whether the linker accepts -Wl,--large-address-aware... no
checking whether C++ compiler accepts -Wstack-protector... yes
checking whether C++ compiler accepts -fstack-protector-all... yes
checking whether C++ compiler accepts -fPIE... yes
checking whether C++ preprocessor accepts -D_FORTIFY_SOURCE=2... yes
checking whether C++ preprocessor accepts -U_FORTIFY_SOURCE... yes
checking whether the linker accepts -Wl,--dynamicbase... no
checking whether the linker accepts -Wl,--nxcompat... no
checking whether the linker accepts -Wl,-z,relro... yes
checking whether the linker accepts -Wl,-z,now... yes
checking whether the linker accepts -pie... yes
checking stdio.h usability... yes
checking stdio.h presence... yes
checking for stdio.h... yes
checking for stdlib.h... (cached) yes
checking for unistd.h... (cached) yes
checking for strings.h... (cached) yes
checking for sys/types.h... (cached) yes
checking for sys/stat.h... (cached) yes
checking for MSG_NOSIGNAL... yes
checking for Berkeley DB C++ headers... /usr/include/db4/
checking for main in -ldb_cxx-4.8... yes
checking miniupnpc/miniwget.h usability... no
checking miniupnpc/miniwget.h presence... no
checking for miniupnpc/miniwget.h... no
checking miniupnpc/miniupnpc.h usability... no
checking miniupnpc/miniupnpc.h presence... no
checking for miniupnpc/miniupnpc.h... no
checking miniupnpc/upnpcommands.h usability... no
checking miniupnpc/upnpcommands.h presence... no
checking for miniupnpc/upnpcommands.h... no
checking miniupnpc/upnperrors.h usability... no
checking miniupnpc/upnperrors.h presence... no
checking for miniupnpc/upnperrors.h... no
checking for boostlib >= 1.20.0... yes
checking whether the Boost::System library is available... yes
checking for exit in -lboost_system... yes
checking whether the Boost::Filesystem library is available... yes
checking for exit in -lboost_filesystem... yes
checking whether the Boost::Program_Options library is available... yes
checking for exit in -lboost_program_options-mt... yes
checking whether the Boost::Thread library is available... yes
checking for exit in -lboost_thread... yes
checking whether the Boost::Chrono library is available... yes
checking for exit in -lboost_chrono-mt... yes
checking whether the Boost::Unit_Test_Framework library is available... yes
checking for dynamic linked boost test... yes
checking for SSL... yes
checking for CRYPTO... yes
checking for PROTOBUF... no
configure: WARNING: libprotobuf not found; bitcoin-qt frontend will not be built
checking whether to build bitcoind... yes
checking whether to build bitcoin-cli... yes
checking whether to build Bitcoin Core GUI... no (Qt)
checking for operating system IPv6 support... yes
checking if ccache should be used... no
checking if wallet should be enabled... yes
checking whether to build with support for IPv6... yes
checking whether to build with support for UPnP... no
checking whether to build test_bitcoin... yes
configure: creating ./config.status
config.status: creating Makefile
config.status: creating src/Makefile
config.status: creating src/test/Makefile
config.status: creating src/qt/Makefile
config.status: creating src/qt/test/Makefile
config.status: creating share/setup.nsi
config.status: creating share/qt/Info.plist
config.status: creating qa/pull-tester/run-bitcoind-for-test.sh
config.status: creating qa/pull-tester/build-tests.sh
config.status: creating src/bitcoin-config.h
config.status: executing depfiles commands
$

If it does not, review all the previous steps and repeat.

Make, Install & Execute (Note "d" after bitcoin. We use Bitcoin wallet as daemon)


make
sudo make install
bitcoind


Expected output:

$ bitcoind
Error: To use the "-server" option, you must set a rpcpassword in the configuration file:
/home/ec2-user/.bitcoin/bitcoin.conf
It is recommended you use the following random password:
rpcuser=bitcoinrpc
rpcpassword=abcdabcdabcdabcdabcdabcdabcdabcdabcdabcdabcdabcd
(you do not need to remember this password)
The username and password MUST NOT be the same.
If the file does not exist, create it with owner-readable-only file permissions.
It is also recommended to set alertnotify so you are notified of problems;
for example: alertnotify=echo %s | mail -s "Bitcoin Alert" admin@foo.com
$

Bitcoind is telling us that we need a minimal configuration file to start with. With the first execution the .bitcoin folder is automatically created under our user directory.


cd
cd .bitcoin

vim bitcoin.conf


You can begin with this basic configuration file (Manual page).

server=1
daemon=1
rpcuser=<A LONG & UNIQUE USERNAME HERE>
rpcpassword=<A VERY GOOD PASSWORD HERE>

Let's try again:


bitcoind


And the expected result on console:

Bitcoin server starting


and now the debug.log file should be moving. We can see the initialization process and messages like these:

2014-04-08 18:34:33 Pre-allocating up to position 0x100000 in rev00000.dat
2014-04-08 18:34:33 UpdateTip: new best=00000000839a8e6886ab5951d76f411475428afc90947ee320161bbf18eb6048  height=1  log2_work=33.000022  tx=2  da
te=2009-01-09 02:54:25 progress=0.000000
2014-04-08 18:34:33 ProcessBlock: ACCEPTED
2014-04-08 18:34:33 UpdateTip: new best=000000006a625f06636b8bb6ac7b960a8d03705d1ace08b1a19da3fdcc99ddbd  height=2  log2_work=33.584985  tx=3  da
te=2009-01-09 02:55:44 progress=0.000000
2014-04-08 18:34:33 ProcessBlock: ACCEPTED
2014-04-08 18:34:33 UpdateTip: new best=0000000082b5015589a3fdf2d4baff403e6f0be035a5d9742c1cae6295464449  height=3  log2_work=34.000022  tx=4  da
te=2009-01-09 03:02:53 progress=0.000000
2014-04-08 18:34:33 ProcessBlock: ACCEPTED

This is our wallet loading and verifying all the Bitcoin blockchain. When the process is complete your wallet will become a node of the Bitcoin network and will help validating Bitcoin transactions. It could take more than 24 hours for the process to complete. You can learn more about this here.
There is a way to speed up this process by downloading a Torrent file. More details at the end of this post.

You can issue commands to interact with the daemon. For instance:


bitcoind getblockcount


to get the number of blocks imported so far. Type bitcoind help for the whole list.


Initializing Blockchain database using Torrent


bitcoind stop
sudo yum install transmission-cli
cd ~/.bitcoin
transmission-cli https://bitcoin.org/bin/blockchain/bootstrap.dat.torrent
bitcoind -loadblock=~/.bitcoin/bootstrap.dat


Torrent File ReadMe.txt


This article is now obsolete.
Please refer to the newer version:


Monday, February 10, 2014

Amazon Web Services Mobile will be hiring at the Mobile World Congress in Barcelona MWC 2014


Where?
Barcelona, Spain
Exact location: TBD

When?
From February 25th to 28th

Who?
AWS Mobile and Developer Tools team

What they are looking for?
- Software Development Engineers
- Business Development Managers
- Technical Program Managers
- Software Development Managers/Directors
- Product Managers

What do I need?
- Bachelor's Degree in Computer Science or related field
- 6+ years professional experience in software development
- Computer Science fundamentals in object-oriented design, data structures, and complexity analysis
- Proficiency in at least one object-oriented programming language such as Java or C++

Contact:
- Send your resume to aws-mobile-hiring-team@amazon.com
or
- Join the facebook Event page
or
- Contact with Melissa Morgan (AWS) melissm@amazon.com

Links:
https://www.facebook.com/events/210848089104467
http://aws.amazon.com/careers/mobile-jobs/
http://www.linkedin.com/jobs2/view/11284683
http://www.amazon.com/gp/jobs
https://twitter.com/awscloud/status/428875999720505346

Good luck!