Tuesday, October 15, 2013

Amazon Web Services CloudFront Edge Locations Codes

blog-domenech-org-aws-cloudfront-logo

Following the thread opened with my previous post about AWS CloudFront Edge Locations Codes, here there is an updated list.

Amazon Web Services names their Edge Locations after the closest International Airport IATA Code.


AMS1  Amsterdam, The Netherlands
AMS50 Amsterdam, The Netherlands
ARN1  Stockholm, Sweden
ATL50 Atlanta, Georgia
BOM2  Mumbai, India
CDG3  Paris, France
CDG50 Paris, France
CDG51 Paris, France
DFW3  Dallas, Texas
DFW50 Dallas, Texas
DUB2  Dublin, Ireland
EWR2  Newark, New Jersey
FRA2  Frankfurt, Germany
FRA50 Frankfurt, Germany
FRA6  Frankfurt, Germany
GRU1  Sau Paulo, Brazil
GIG50 Rio de Janerio, Brazil
HKG1  Hong Kong Island, Hong Kong
HKG50 Hong Kong Island, Hong Kong
IAD12 Ashburn, Virginia
IAD2  Ashburn, Virginia
IAD53 Ashburn, Virginia
ICN50 Seoul, South Corea
IND6  South Bend, Indiana
JAX1  Jacksonville, Florida
JFK1  Nueva York, New York
JFK5  Nueva York, New York
JFK6  Nueva York, New York
LAX1  Los Angeles, California
LAX3  Los Angeles, California
LHR3  London, United Kingdom
LHR5  London, United Kingdom
LHR50 London, United Kingdom
MAA3  Chennai, India
MAD50 Madrid, Spain
MIA3  Miami, Florida
MIA50 Miami, Florida
MNL50 Manila, Philippines
MRS50 Marseille, France 
MXP4  Milan, Italy
NRT12 Tokyo, Japan
NRT52 Tokyo, Japan
NRT53 Tokyo, Japan
NRT54 Tokyo, Japan
SEA4  Seattle, Washington
SEA50 Seattle, Washington
SFO4  San Francisco, California
SFO5  San Francisco, California
SFO9  San Francisco, California
SIN2  Republic of Singapore
SIN3  Republic of Singapore
STL2  St. Louis, Missouri
SYD1  Sydney, Australia
TPE50 Taipei, Taiwan
WAW50 Warsaw, Poland 

Total = 55
Note: This is an historic list. Some of these Edge Location codes are not longer active.

Official Information: AWS Global Infrastructure

The Edge Location code is present in the CloudFront access logs (3rd field). To activate access logs for your CloudFront distribution follow these instructions.

Would you like to see them on the map? Check this Google Maps about Amazon Web Services.


Sunday, October 6, 2013

Deploy SSH Authorized Keys using S3 and AWS CLI with temporary credentials

amazon-aws-command-line-interface-python-install-domenech-org


Disclaimer: Modifying security credentials could render in loosing access to your server in case of problems. I strongly suggest you test the method described here in your Development environment before using it in Production.


Key-Pairs is the standard method to authenticate SSH access to our EC2 Instances based on AWS AMI Linux. We can easily create new Key-Paris for our team using the ssh-keygen command and manually adding them to the file /home/ec2-user/.ssh/authorized_keys for those with root access.
Format:

/home/ec2-user/.ssh/authorized_keys
ssh-rsa AAAAAAAAAAAAAAAAAAAAAAAAAAAAAAAAAAAAAAAAAAAAAAAAAAAAAAAAAAAAAAAA
AAAAAAAAAAAAAAAAAAAAAAAAAAAAAAAAAAAAAAAAAAAAAAAAAAAAAAAAAAAAA== main-key
ssh-rsa BBBBBBBBBBBBBBBBBBBBBBBBBBBBBBBBBBBBBBBBBBBBBBBBBBBBBBBBBBBBBBBB
BBBBBBBBBBBBBBBBBBBBBBBBBBBBBBBBBBBBBBBBBBBBBBBBBBBBBBBBBBBBB== juan
ssh-rsa CCCCCCCCCCCCCCCCCCCCCCCCCCCCCCCCCCCCCCCCCCCCCCCCCCCCCCCCCCCCCCCC
CCCCCCCCCCCCCCCCCCCCCCCCCCCCCCCCCCCCCCCCCCCCCCCCCCCCCCCCCCCCC== pedro
ssh-rsa DDDDDDDDDDDDDDDDDDDDDDDDDDDDDDDDDDDDDDDDDDDDDDDDDDDDDDDDDDDDDDDD
DDDDDDDDDDDDDDDDDDDDDDDDDDDDDDDDDDDDDDDDDDDDDDDDDDDDDDDDDDDDD== luis

But when the number of instances and members grows we need a centralized method of distribution of this file.

Goal

- Store an authorized_keys file in S3 encrypted "at-rest".
- Transport this file from S3 to the instance securely.
- Give access to this file only to the right instances.
- Do not store any API Access Keys into the involved script.
- Store all the temporary files in RAM.


S3

- Create a bucket. In this example is "tarro".

- Create in your local an authorized_keys file and upload it to the new bucket.

- Select the file properties with S3 Console and select Server Side Encryption = AES256 and Save.

aws-s3-server-side-encryption-aes256

- Calculate the MD5 of the file with md5sum
Example:


$ md5sum authorized_keys
690f9d901801849f6f54eced2b2d1849  authorized_keys

- Create a file called authorized_keys.md5, copy the md5sum result in (only the hexadecimal string of numbers and letters) and upload it to the same S3 bucket.


IAM

We will use an EC2 IAM instance role. This way we don't need to store a copy of our API Access Key into the instances who will be accessing the secured files. AWS Command Line Interface (AWS CLIwill automatically access to the EC2 Instance Metadata and retrieve a temporary security credential needed to connect to S3. We will specify a role policy to grant read access to the bucket that contains those files.

- Create a role using the IAM Console. In my example is "demo-role".
- Select Role Type = Amazon EC2.
- Select Custom Policy.
- Create a role policy to grant read access only to "tarro" bucket. Example:

{
  "Version": "2012-10-17",
  "Statement": [
    {
      "Action": [
        "s3:GetObject",
        "s3:ListBucket"
      ],
      "Sid": "Stmt1380102067000",
      "Resource": [
        "arn:aws:s3:::tarro/*"
      ],
      "Effect": "Allow"
    }
  ]
}

EC2

We will use Amazon Linux AMI 2013.09 which includes AWS CLI.

- Launch your instance as you usually do but now select the IAM Role and choose the appropriate one. In my example is "demo-role" but you could have different roles for every application tier like: web servers, data bases, test, etc.

aws-ec2-iam-role-metadata-s3-domenech.org

- Under root, create /root/bin/

- In /root/bin/ create the file deploy-keys.sh with the following content:

#!/bin/bash
#
# /root/bin/deploy-keys.sh
# Install centralized authorized_keys file from S3 securely using temporary security credentials
# blog.domenech.org
#

### User defined variables
BUCKET="tarro"
TMPFOLDER="/media/tmpfs/"
# (Finish TMPFOLDER variable with slash)

# Note:
# The temporary folder in RAM size is 1 Megabyte. 
# If you are planning to deal with files bigger than that you have to change line #24 accordingly

# Create temporary folder
if [ ! -e $TMPFOLDER ] 
then
 mkdir $TMPFOLDER
fi

# Mount temporary folder in RAM
mount -t tmpfs -o size=1M,mode=700 tmpfs $TMPFOLDER

# Get-Object from S3
COMMAND=`aws s3api get-object --bucket $BUCKET --key "authorized_keys" $TMPFOLDER"authorized_keys"`
if [ ! $? -eq 0 ]
then
 umount $TMPFOLDER
 logger "deploy-keys.sh: aws s3api get-object authorized_keys failed! Exiting..."
 exit 1
fi 

# Get-Object from S3 (MD5)
COMMAND=`aws s3api get-object --bucket $BUCKET --key "authorized_keys.md5" $TMPFOLDER"authorized_keys.md5"`
if [ ! $? -eq 0 ]
then
 umount $TMPFOLDER
        logger "deploy-keys.sh: aws s3api get-object authorized_keys.md5 failed! Exiting..."
        exit 1
fi

# Check MD5, copy the new file if matches and clean up
MD5=`cat $TMPFOLDER"authorized_keys.md5"`
MD5NOW=`md5sum $TMPFOLDER"authorized_keys" | awk '{print $1}'`
if [ $MD5 == $MD5NOW ]
then
 mv --update /home/ec2-user/.ssh/authorized_keys /home/ec2-user/.ssh/authorized_keys.original
 cp --force $TMPFOLDER"authorized_keys" /home/ec2-user/.ssh/authorized_keys
 chown ec2-user:ec2-user /home/ec2-user/.ssh/authorized_keys
 chmod go-rwx /home/ec2-user/.ssh/authorized_keys
 # The unmount command will delete all the files in RAM but we are extra cautious here shredding and removing
 shred $TMPFOLDER"authorized_keys"; shred $TMPFOLDER"authorized_keys.md5"
 rm $TMPFOLDER"authorized_keys"; rm $TMPFOLDER"authorized_keys.md5"; umount $TMPFOLDER
 logger "deploy-keys.sh: Keys updated successfully."
 exit 0
else
        shred $TMPFOLDER"authorized_keys"; shred $TMPFOLDER"authorized_keys.md5"
        rm $TMPFOLDER"authorized_keys"; rm $TMPFOLDER"authorized_keys.md5"; umount $TMPFOLDER
 logger "deploy-keys.sh: MD5 check failed! Exiting..."
 exit 1
fi


- And give execution permissions to root and remove unnecessary Read/Write permissions.

OR you can do it all at once more easily executing this command:


mkdir /root/bin/; cd /root/bin/; wget -q http://www.domenech.org/files/deploy-keys.sh; chmod u+x deploy-keys.sh; chmod go-rwx deploy-keys.sh; chown root:root deploy-keys.sh

and test the script. You can check the script results at /var/log/messages

- Trigger after reboot the script by adding the line /root/bin/deploy-keys.sh at the system init script /etc/rc.local

#!/bin/sh
#
# This script will be executed *after* all the other init scripts.
# You can put your own initialization stuff in here if you don't
# want to do the full Sys V style init stuff.

touch /var/lock/subsys/local

/root/bin/deploy-keys.sh


Friday, October 4, 2013

Certificación de Amazon Web Services: Solutions Architect - Associate

Amazon-Web-Services-Certified-Solutions-Architect-Associate

Amazon Web Services (AWS) ha puesto en marcha su programa de certificación profesional y la primera de ellas está disponible para pasar examen: AWS Certified Solutions Architect - Associate Level.  El examen se realiza en los centros Kryterion y en su red de asociados. En España las dos únicas opciones son Madrid y Barcelona y tiene un coste de 150$. El temario está detallado públicamente en el Exam Guide y se realiza en inglés.

Según se desprende de la información publicada, en el road-map hay previstas un total de tres certificaciones: Solutions Architect (la comentada aquí) y las futuras SysOps Administrator y Developer. La intención es crear 3 roles distintos para agrupar dentro de cada uno de ellos los distintos profesionales que utilizan los servicios de AWS. Una certificación profesional tiene como principal misión facilitar la elección de profesionales por la parte de empleadores y facilitar la elección de empresas de servicios por parte de clientes. Una certificación nos asegura unos mínimos de competencia que nos ahorrar tiempo a la hora de escoger a nuestros empleados y a nuestros proveedores.

Es importante destacar que como suele ser común en las certificaciones de empresas tecnológicas, cada una de ellas dispondrá de varios niveles. AWS tiene previsto tres niveles: Associate, Professional y Master para cada una de ellas. Mi interpretación de estos niveles, basándome en mi experiencia previa con otras empresas, sería la siguiente:
- El primer nivel es una puerta de entrada y la mayoría de técnicos con un conocimiento amplio del producto pueden optar a él. El examen es completamente teórico. Es fácil.
- El segundo demuestra un conocimiento profundo del producto y suelen poseerlo profesionales que se relacionan con esa tecnología frecuentemente en su día a día laboral. El examen además de teoría suele incluir ejercicios prácticos donde se simulan tareas que el profesional se encontrará en el mundo real pero con una cantidad de tiempo limitado para resolverlos. Es difícil.
- El tercer nivel nos indica un experto donde la totalidad de su desempeño profesional está ligado al producto al que hace referencia la certificación. Sus conocimientos están por encima de lo necesario para el uso completo de esa tecnología y se aproxima más aun profesor que a un experto. El examen suele ser completamente práctico y suele realizarse en las oficinas centrales de la empresa supervisado por personal directamente relacionado con la creación de dicha tecnología. Es extremadamente difícil.

Estoy ansioso de que estén disponibles las nuevas certificaciones y el siguiente nivel para Solutions Architect. Invito a todos los profesionales relacionados con la ingeniería de sistemas y el cloud computing a seguir de cerca esta certificación ya que se convertirá muy pronto en un nuevo estandard de nuestra industria.


Actualización 8-Oct-2013
Certification Roadmap AWS Certified Solutions Architect, Developer and SysOps Administrator


Tuesday, September 24, 2013

Where is GoogleBot?

http://www.gravitateonline.com/site-development/googlebot-engage

Due the importance of SEO and the relevance of Google search engine is not uncommon to hear this question in a meeting: From where GoogleBot crawler crawls our site? Design and investment decisions are made based on the answer to that question. Is a popular believe that Google Inc. crawler GoogleBot resides at California, USA but I'm afraid this is not accurate.

I've discovered this:

- GoogleBot is not only a bunch of servers (obviously). It is a very big distributed cluster with hundreds of machines. My site is indexed from more than 900 different Google IP addresses every day.
- I've identified 7 different GoogleBot crawling clusters.
- They seem to connect to my site from 6 different locations.
- Almost all of them are in USA but one location is Europe.

Origin IP

With access to your web site log files you can "grep" the string "http://www.google.com/bot.html" on the referrer field and find out which IP GoogleBot is using when it pays you a visit. There are some other malicious crawlers that fake their referrer as GoogleBot but they're easily spotted. Google Inc. owns the Autonomous System AS15169 and its connections come from there. In my case I got connections from those IP ranges below, during the last six months:

 66.249.72.xxx 
 66.249.73.xxx
 66.249.74.xxx
 66.249.75.xxx
 66.249.76.xxx
 66.249.78.xxx
 66.249.80.xxx
 66.249.81.xxx
 66.249.82.xxx
 66.249.83.xxx
 66.249.84.xxx
 66.249.85.xxx

Google advises that the way to find out if an Origin IP belongs to GoogleBot is to do a reverse DNS resolution and look for crawl-xx-xxx-xx-xxx.googlebot.com in the result.
Applying that the final list to work with is:

66.249.72.xxx 1.72.249.66.in-addr.arpa domain name pointer crawl-66-249-72-1.googlebot.com.
66.249.73.xxx 1.73.249.66.in-addr.arpa domain name pointer crawl-66-249-73-1.googlebot.com.
66.249.74.xxx 1.74.249.66.in-addr.arpa domain name pointer crawl-66-249-74-1.googlebot.com.
66.249.75.xxx 1.75.249.66.in-addr.arpa domain name pointer crawl-66-249-75-1.googlebot.com.
66.249.76.xxx 1.76.249.66.in-addr.arpa domain name pointer crawl-66-249-76-1.googlebot.com.
66.249.77.xxx 1.77.249.66.in-addr.arpa domain name pointer crawl-66-249-77-1.googlebot.com.
66.249.78.xxx 1.78.249.66.in-addr.arpa domain name pointer crawl-66-249-78-1.googlebot.com.

I don't take into account the networks 66.249.80.xxx, 66.249.81.xxx, etc. because seem to be used by Feedfetcher-Google and Mediapartners-Google (AdSense) and that's out of the scope of this post.

Latency = Hint

Nowadays is tricky to know where a IP is located when it belongs to a big network. Anycast routing method (like the one used with the popular Google Public DNS Service 8.8.8.8) becomes a challenge if you want to be certain. Google Inc. IP addresses are administrative located at Mountain View, California and without any further analysis this is the conclusion you will get.

But when I ping those networks from my server (Paris, France), write the obtained round trip times on a table and give a look to the Google Data Centers map... One can guess and approximated geographic location for those GoogleBot clusters:

IPv4 Network   Ping Round Trip   Location
 66.249.72.2 
92 ms 
USA East Coast ?
 66.249.73.2 
114 ms 
USA Mid West ?
 66.249.74.2 
152 ms 
 USA West Coast ? 
 66.249.75.2 
96 ms 
USA East Coast ?
 66.249.76.2  (Not active since 
2013-05-29)
Unknown
 66.249.77.2 
274 ms 
Unknown
(Not USA nor Europe ?)
 66.249.78.2 
13 ms 
Dublin, Ireland ? 

Round Trip milliseconds is not an accurate method to place a system on the map but the answer I'm trying to answer here is whether GoogleBot is at California or not. As you see, there is not a short answer but at least we know that it is spread around different locations within the States and Europe.

Tuesday, September 17, 2013

Using Varnish Proxy Cache with Amazon Web Service ELB Elastic Load Balancer


using-varnish-proxy-cache-with-amazon-web-services-elastic-load-balancer-elb


Update 19-Feb-2014 ! Elastic Load Balancing Announces Cross-Zone Load Balancing
Maybe this new option makes unnecessary my workaround. Anyone can confirm?


The problem
When putting a Varnish cache in front of an AWS EC2 Elastic Load Balancer weird things happen like: Not getting any traffic to your instance or getting traffic to just one of your instances (in case of Multi Availability Zone (AZ) deployment).

Why?
This has to do with how the ELB is designed and how Varnish is designed. Is not a flaw. Let's call it: Incompatibility.
When you deploy a Elastic Load Balancer into EC2 you access it through a CNAME DNS address. When you deploy an ELB in front of multiple instances in multiple Availability Zones that CNAME is not a DNS address, is many.

Example:
$ dig www.netflix.com

; <<>> DiG 9.8.1-P1 <<>> www.netflix.com

;; global options: +cmd
;; Got answer:
;; ->>HEADER<<- opcode: QUERY, status: NOERROR, id: 64502
;; flags: qr rd ra; QUERY: 1, ANSWER: 4, AUTHORITY: 0, ADDITIONAL: 0

;; QUESTION SECTION:

;www.netflix.com. IN A

;; ANSWER SECTION:

www.netflix.com. 300 IN CNAME dualstack.wwwservice--frontend-san-756424683.us-east-1.elb.amazonaws.com.
dualstack.wwwservice--frontend-san-756424683.us-east-1.elb.amazonaws.com. 60 IN A 184.73.248.59
dualstack.wwwservice--frontend-san-756424683.us-east-1.elb.amazonaws.com. 60 IN A 107.22.235.237
dualstack.wwwservice--frontend-san-756424683.us-east-1.elb.amazonaws.com. 60 IN A 184.73.252.179


As you can see, the answer for this CNAME DNS resolution for Netflix's ELB are 3 different IP addresses. Is up to the application (usually your Internet Web Browser) to decide which to use. Different clients will chose different IPs (they are not always sorted the same way) and this will balance the traffic among different AZs.
The bottom line is that your ELB in real life are multiple instances in multiple AZs and the CNAME mechanism is the method used to balance them.

But Varnish behaves different
And when you specify a CNAME as a Varnish backend server (the destination server where Varnish requests will be send to) it will translate that into only one IP. Despite the amount of IP addresses associated with that CNAME. It will only chose one and use that one for all its activity. Therefore Varnish and AWS ELB are not compatible. (Would you like to suggest a change?)

The Solution
Put a NGINX web server between Varnish and the ELB, acting as a load balancer. I know, not elegant. but works and once is in place no maintenance is needed and the process overhead for the Varnish server is minimum.

Setup
- Varnish server listening on TCP port 80 and configured to send all its requests to 127.0.0.1:8080
- NGINX server listening on TCP port 127.0.0.1:8080 and sending all its requests to our EC2 ELB.

Basic configuration (using AWS EC2 AMI Linux)

yum update
reboot

yum install varnish
yum install nginx

chkconfig varnish on
chkconfig nginx on

Varnish

vim /etc/sysconfig/varnish

Locate the line:
VARNISH_LISTEN_PORT=6081
and change if for
VARNISH_LISTEN_PORT=80

vim /etc/varnish/default.vcl

Locate the backend default configuration and change port from 80 to 8080
backend default {
  .host = "127.0.0.1";
  .port = "8080";
}


NGINX

vim /etc/nginx/nginx.conf

Get rid of the default configuration file and use this example:
worker_processes  1;

events {
    worker_connections  1024;
}

http {
    include       mime.types;
    default_type  application/octet-stream;

    keepalive_timeout  65;

    server_tokens off;

server {
    listen       localhost:8080;

    location / {
     ### Insert below your ELB DNS Name leaving the semicolon at the end of the line
     proxy_pass  http://<<<<Insert-here-your-ELB-DNS-Name>>>>;
     proxy_set_header Host $http_host;

   }
}

}


Restart
service varnish restart
service nginx restart

And voila! Comments and improvement are welcome.


Thanks to
Jordi and Àlex for your help!


Update 19-Feb-2014 ! Elastic Load Balancing Announces Cross-Zone Load Balancing
Maybe this new option makes unnecessary my workaround. Anyone can confirm?


Thursday, April 18, 2013

AWS Diagrams Adobe Illustrator Object Collection: First Release


aws-diagrams-ec2-adobe-illustrator-collection-first-release-logo

Due to popular demand I've decided to release the collection of vector graphics objects I use to draw Amazon Web Services architecture diagrams. This is the first release and more are on the way. This is an Adobe Illustrator CS5 (.AI) file. I've obtained this artwork from the original AWS Architecture PDF files published at the AWS Architecture Center.
You can use Adobe Illustrator to open this file and to create your diagrams or you can export these objects to SVG format and use GNU software to work with them. The file has been saved in "PDF Compatibility Mode" so plenty of utilities can import it without the need of using Adobe Illustrator (With Inkscape for instance).

Disclaimer:
- I provide this content as it is. No further support of any kind can be provided. I'd love to receive your comments and suggestions but I can not help you drawing diagrams.
- As far as I know this content is not copyrighted (1). Feel free to use it.
- Those designs have been created by a brilliant and extraordinary person that works in AWS. I'm just a channel of communication here. All credits should go to him.

Download link: http://bit.ly/17rkyCo


aws-diagrams-ec2-adobe-illustrator-collection-first-release-thumbnail


And that's it. Comments are welcome. Have fun and enjoy!

Tuesday, March 5, 2013

Monday, January 14, 2013

Backing up Ubuntu Using Deja Dup and Amazon Web Services S3

deja-dup-duplicity-ubuntu-aws-s3-backup-logo

Ubuntu includes a nice backup tool called Déjà Dup based on Duplicity that gives us just the options we need to handle our home backups. With just a couple of settings we can use Amazon Web Services S3 as device for those backups.


S3 Bucket and Credentials

If none specified, Deja-Dup will automatically create a bucket in S3 using our credentials. This will happen at the default AWS Region (North Virginia). If you need your backups placed elsewhere (a closer region for example) you should manually create a S3 bucket for that purpose.

You need to create an AWS IAM user with S3 privileges and export its credentials to be used with Deja-Dup.


Install Additional Packages

By default the Ubuntu backup utility does't recognize AWS S3 as Backup Storage. We need these additional packages:


# sudo apt-get install python-boto

# sudo apt-get install python-cloudfiles


S3 configuration

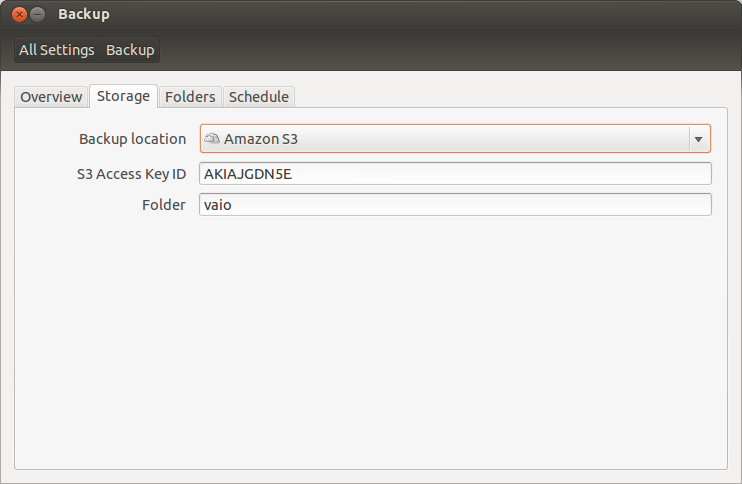
Open Déjà-Dup (Backup) and select the Storage menu. If the additional packages are correctly installed you should have "Amazon S3" as an available Backup Location. Select it and type your S3 Key and the folder your like to store your laptop backup.

blog-domenech-org-aws-s3-ubuntu-backup-deja-dup

You should see something like the capture above. Close the Backup utility.


Bucket Configuration

To tell Déjà-Dup the bucket name we want to use we need dconf. Execute dconf or install it if needed (sudo apt-get install dconf-tools).

Access to  / org / gnome / deja-dup / s3  folder:

blog-domenech-org-aws-s3-ubuntu-backup-deja-dup-dconf

Substitute the random generated Deja-Dup bucket name by yours and close dconf.


Backup Launch

Start again Deja-Dup and launch your backup. A pop-up window will appear asking you for the S3 Secret Access Key. My suggestion is to select to remember those credentials to avoid the need of typing them every time.

blog-domenech-org-amazon-web-services-ubuntu-backup-deja-dup-connect-to-s3

And the rest of the backup process is standard: Pop-up window asking you for a password to encrypt the backup files, scan progress window, etc.
I suggest you to check after a successful backup whether the duplicity files are in the expected S3 Bucket or not. And pay attention to the "Folders to Ignore" Backup setting to avoid copying unnecessary files. S3 is cheap but is not free.